Home >> (Table of Contents) Supported Data and Trading Services >> Simulated Futures Trading Service
Simulated Futures Trading Service
- Introduction
- Setup Instructions
- Symbols
- Notes
- Trading Account Monitoring
- Provide Read-only Access to Trade Account to Another User
- Account Balance Adjustments
- Margin Requirement Adjustments
- Deleting Trade Account
- Web-Based Trading Panel
- Using Internal Sierra Chart Trade Simulation Mode
- Accessing Real-time Data
- Using Delayed Data with Real-time Trading Evaluator
Introduction
The Sierra Chart Simulated Trading Service, provides a very realistic Server-side simulation environment for trading outright futures contracts and also Forex markets within Sierra Chart.
You will have access to your trading results within Sierra Chart and you can also share your trading account read-only to other users for them to access all of the Trade Statistics and Trades related to your trading.
This service supports sharing your real-time and historical trading data with any other Sierra Chart user or a trading evaluator.
Sierra Chart also has an internal Trade Simulation Mode which works directly within Sierra Chart and is not an external service. Therefore, you can use this Trade Simulation Mode instead of the Simulated Trading Service documented on this page. If you want to use Trade Simulation Mode, you will need to set Global Settings >> Data/Trade Service Settings >> Main Settings >> Current Selected Service to "SC Data - All Services" and not use "Trading Evaluator".
The features are as follows:
- Realistic order fills based on estimated position in queue.
- Server-side OCO orders.
- Server-side bracket orders.
- Completely stable.
- 100% availability. 24 hours a day, 7 days a week.
- Very fast.
- Order entry and fills follows market session times.
- Daily Loss Limit risk management. Based on either specified currency value or percentage of account value. When daily loss limit has been met, can either automatically close positions or only allow orders which will reduce position quantity.
- Position and order quantity limits both globally and per symbol.
- Powered by the Sierra Chart/Denali Exchange Data Feed or the Delayed Exchange Data Feed provides historical, delayed streaming and real time streaming data. 1400 levels of market depth. These data feeds provide extensive historical data. And market by order data.
- Complete, detailed and reliable trade statistics which can also be accessed by a trading evaluator.
- Long-term (At least 3 Years) order fill history maintained.
- Account balance tracking with frequent updating of data fields. All fields are supported. This is one advantage of using this service over the internal Trade Simulation mode of Sierra Chart which does not provide account balance functionality.
- Detailed and accurate Trade Position tracking with margin calculations.
- Supports CME/CBOT/NYMEX/COMEX, cash Forex, and BitMex tradable products.
- Delayed version which supports delayed data for CME/CBOT/NYMEX/COMEX. EUREX, cash Forex and BitMex is not supported with delayed service. No additional cost for delayed data.
- All trading is performed through a remote server where all of the history is recorded and the Sierra Chart internal Trade Simulation Mode is automatically disabled when using this service.
This prevents any loss of trading activity from being recorded on the server which would prevent a trading evaluator from looking at the trading activity.
It has been a common problem when users are using other external trade simulation services, not this one, that Sierra Chart Trade Simulation Mode (Trade >> Trade Simulation Mode On) has been left on and the users trading has not been transmitted to the remote server, preventing the users trading results from being viewable by the trade evaluator. This is no longer a problem with the Sierra Chart simulated trading service. - There is no need to involve a broker or live trading account or exchange fees. This is a fully self-sufficient service.
Trading ICE symbols is not supported.
Setup Instructions
- Update Sierra Chart to version 2268 or higher. Update by selecting Help >> Download Prereleasefrom within Sierra Chart. For more information, refer to the Fast Update instructions.
- Select Global Settings >> Data/Trade Service Settings.
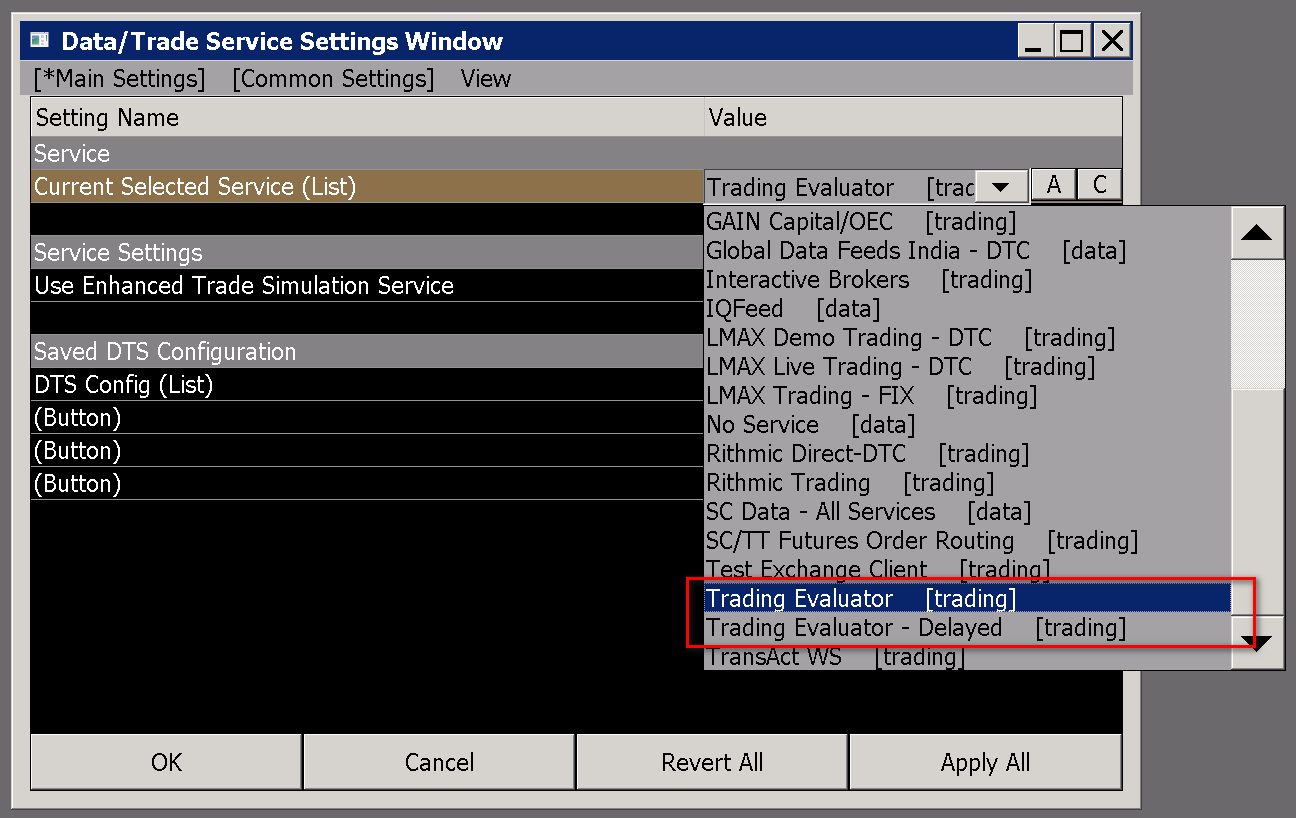
- Set the Current Selected Service to Trading Evaluator [trading] or Trading Evaluator - Delayed [trading] depending upon whether you want to use the real-time or delayed trading evaluator. The real-time trading evaluator requires real-time data. Refer to the image below.
- Press OK.
- Connect to the data feed with File >> Connect to Data Feed. If you have trouble connecting, contact Sierra Chart support.
- Select Trade >> Trade Accounts Monitor.
- Select Manage >> New Trade Account.
- In the Trade Account edit field enter any trade account identifier which is at least three characters. Using letters and numbers only.
If you are migrating from the old server-based Simulated Trading Service to the new one, then use the same Trade Account identifier that you have on the old system. If you are not sure what that is, contact us on the Support Board. - In the Currency Code field, select USD or EUR. You should use the currency which matches the exchange you will be trading on. Although this is not required.
- The other fields and other tabs of settings can be left as they are. You can change them as you require. They will be documented as soon as possible. The default settings are fine.
- The settings related to Master Firm Control Account are for Sierra Chart's use and for clearing firm use. So they are not applicable and it is not possible for individual users to set an account to be a Master Firm Control Account.
- You may want to set the Commission Settings >> Trade Fee Per Contract on the Main tab to the commission per individual contract. This is just for one side. Not a round turn.
- Press the Commit button to commit the changes. The account should be successfully created. A message box will appear indicating whether the commit is successful or not. You can begin to use the Trade Account immediately. If you get an error that says "Operation not allowed", then the trade account identifier already exists. You will need to choose a different trade account identifier.
- On the Trade >> Trade Accounts Monitor window, you will see the account listed. Select it in the list and then select Balance >> Adjust Account Balance to add funds to the account. Use a positive number to add funds. A negative number to reduce funds.
- If you require real-time futures data, then follow the setup instructions for the Denali Exchange Data Feed
Only those users with funded trading accounts can take advantage of lower-priced CME fees for nonprofessional trading accounts. Otherwise, the higher priced CME fees are required for real-time data. To avoid the higher priced fees if you are a nonprofessional, follow the Easy Solution to CME Funded Trading Account Requirement instructions.
There is a delayed data version of the Sierra Chart Simulated Futures Trading service which does not require any separate data feed or cost. So in this case you do not need to use the Denali Exchange Data Feed.
It is best and easiest to get started with the Trading Evaluator - Delayed service first. - Optional: It is recommended you install another copy of Sierra Chart on your system to be used with the Simulated Trading Service so this does not interfere with your other existing installation you may be using for other purposes. For instructions, refer to Step-By-Step Instructions to Install Multiple Copies of Sierra Chart.
The reason to install another copy of Sierra Chart is so that you have a separate installation just for simulated trading on this service. - Open a Chart or Trading DOM through File >> Find Symbol.
- If you have existing Chartbooks that you have been using with another supported Data or Trading service and you want to use them with the Simulated Trading Service, then when one or more of those Chartbooks are open, select Edit >> Translate Symbols to Current Service.
- Submit, modify and cancel orders as you require. Refer to Overview of Trading.
- You can view your trading results through the Trade Activity Log Trade Statistics and Trades tabs.
Symbols
The available symbols are listed in File >> Find Symbol. This includes Futures, cash Forex and crypto currency contracts.
Notes
When receiving a security definition message through the websocket server in response to a security definition request for a symbol, in the case of a futures options symbol, if there is no margin requirement values provided, it is because the exchange is not providing the necessary data to do these calculations.
Trading Account Monitoring
This section explains creating a Trade Account and sharing it with a user for them to use to trade with. You then have the ability to monitor the trading performance of that other user.
The account that you create, you will be the authorized user of it. You have full trading access to this account. You will then share it to another Sierra Chart user. You will share it by giving read/write access to that trading account to that user, so they can then trade it.
When you share a trading account to another user, they will not be able to modify any of the trade account settings or risk management settings. They cannot adjust the Account Balance. Only the authorized user can do any of these things.
By default the authorized user is the Sierra Chart username who created the Trade Account, which would be you. You do have the ability to add another Sierra Chart user as an authorized user of this Trade Account if you require that.
You also have the ability to duplicate an existing account to use it as a template, for a new trade account.
All monitoring of trade accounts you have shared with another user is done through Sierra Chart using the standard interfaces and functions.
The Trade >> Trade Orders Window will list the open orders from all of the trading accounts you have access to.
The Trade >> Trade Positions Window will list the open Trade Positions from all of the trading accounts you have access to.
The account balance and other details about the account can be viewed through the Trade >> Trade Accounts Monitor window.
The Trade >> Trade Activity Log will list the current and historical trading activity, including order fills, from all of the trading accounts you have access to. The Trade Statistics, Trades, Periods Stats, and Account Stats sub windows all function and show the data of individual accounts or multiple accounts.
All of the Trading functionality in Sierra Chart will work identically with these simulated trading accounts.
Creating New Trade Account to Share With Another User
- Select Global Settings >> Data/Trade Service Settings.
- Set the Current Selected Service to Trading Evaluator [trading] or Trading Evaluator - Delayed [trading] depending upon whether you want to use the real-time or delayed trading evaluator. Refer to the image below.
- Press the OK button.
- From within Sierra Chart, select Trade >> Trade Accounts Monitor.
- From the Trade Accounts Monitor window, select Manage >> New Trade Account.
- Enter the trade account identifier, use letters and numbers only (_ and - are allowed). Press the OK button.
- The Trade Account Settings window will display.
- Select Main from the menu.
- On the Main tab, set the Currency Code.
- On the Main tab, set other settings as required. The defaults should be fine for most cases.
- On the Main tab in the Margin Settings section, set Use Percent of Margin Requirement to the percentage of the exchange specified margin requirement to actually use. 100 will use the exchange specified margin. 50 will use 50% of the exchange specified margin.
- Press the Commit button to save the new trade account to the server.
- If successful, you will receive a Commit is Successful prompt. Press OK for that.
- Select Read/Write Shared Usernames from the menu.
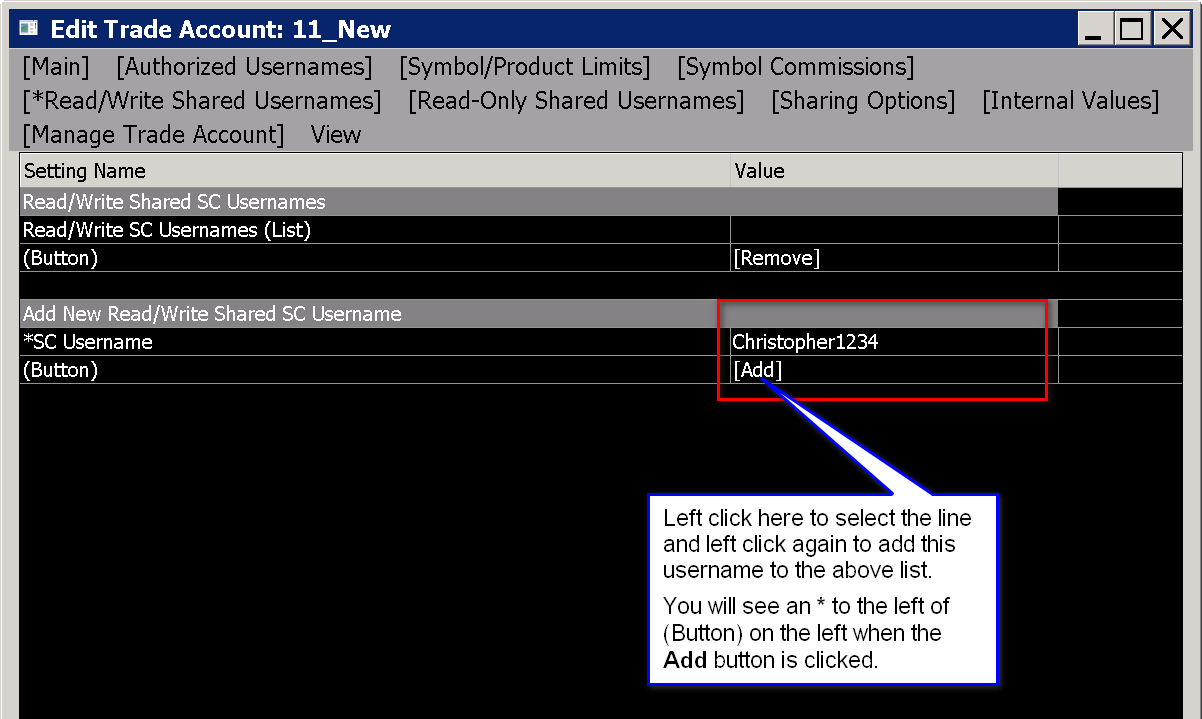
- In the Add New Read/Write Shared SC Username >> SC Username box, enter the Sierra Chart username (Account Name) that you want to share the trading account with. If you do not know this, you need to ask the user this. They will find it under Help >> About in their Sierra Chart installation.
- Left click on the [Add] button below twice to invoke the add action. Refer to the image below. There is no need to perform a Commit after this, as this operation is sent to the server immediately. You will receive a prompt confirming the add is successful.
- This is all. Press the Close button.
- You can monitor the new trade account through the Trade >> Trade Accounts Monitor window.
Duplicating a Trade Account to Share With Another User
- Select Global Settings >> Data/Trade Service Settings.
- Set the Current Selected Service to Trading Evaluator [trading] or Trading Evaluator - Delayed [trading] depending upon whether you want to use the real-time or delayed trading evaluator. Refer to the image below.
- Press the OK button.
- Make sure Sierra Chart is connected to the data feed with File >> Connect to Data Feed.
- From within Sierra Chart, select Trade >> Trade Accounts Monitor.
- From the Trade Accounts Monitor window, select the line for the Trade Account you want to duplicate, in the list.
- From the Trade Accounts Monitor window, select Manage >> Duplicate Trade Account.
- Enter the new trade account identifier you want to use, use letters and numbers only (_ and - are allowed). Press the OK button.
- At the Include existing shared usernames prompt, click No to prevent the existing usernames from being included since most likely you will want to share the account with other usernames.
- The Trade Account Settings window will display.
- Select Main from the menu.
- Press the Commit button to save the new trade account to the server.
- If successful, you will receive a Commit is Successful prompt. Press OK for that.
- Select Read/Write Shared Usernames from the menu.
- In the Add New Read/Write Shared SC Username >> SC Username box, enter the Sierra Chart username (Account Name) that you want to share the trading account with. If you do not know this, you need to ask the user this. They will find it under Help >> About in their Sierra Chart installation.
- Left click on the [Add] button below twice to invoke the add action. Refer to the image below. There is no need to perform a Commit after this, as this operation is sent to the server immediately. You will receive a prompt confirming the add is successful.
- This is all. Press the Close button.
- You can monitor the new trade account through the Trade >> Trade Accounts Monitor window.
Provide Read-only Access to Trade Account to Another User
It is supported to share a trading account with another Sierra Chart user and give them read-only access to it. This is so they can monitor your trading activity and look at all of your trading performance using all of the standard interfaces within Sierra Chart. For example they could use the Trade Statistics tab of the Trade Activity Log.
So if you want to demonstrate your trading capabilities, to another user for whatever purpose, including having them evaluate your trading performance, you have the ability to do this. They should be told that all of your trading activity is managed on a server and cannot be altered by you. So it is a very accurate method of trading performance, assuming you are using real-time data and not delayed data. Although if you are using delayed data, and you are not looking ahead at the real-time data, then your trading history, will be accurate.
The user who you shared the trading account with, can use all of the Trading functionality in Sierra Chart to monitor your trading activity and look at the history.
- Select Global Settings >> Data/Trade Service Settings.
- Set the Current Selected Service to Trading Evaluator [trading] or Trading Evaluator - Delayed [trading] depending upon whether you want to use the real-time or delayed trading evaluator.
- Press the OK button.
- From within Sierra Chart, select Trade >> Trade Accounts Monitor.
- From the Trade Accounts Monitor window, select the line for the Trade Account you want to share, in the list.
- From the Trade Accounts Monitor window, select Manage >> Edit Trade Account.
- The Trade Account Settings window will display.
- You will receive a Update is successful prompt. Press OK at that prompt.
- Select Read-Only Shared Usernames from the menu.
- In the Add New Read-Only Shared SC Username >> SC Username box, enter the Sierra Chart username (Account Name) that you want to share the trading account with. If you do not know this, you need to ask the user this. They will find it under Help >> About in their Sierra Chart installation.
- Left click on the [Add] button below twice to invoke the add action. Refer to the image below. There is no need to perform a Commit after this, as this operation is sent to the server immediately. You will receive a prompt confirming the add is successful.
- This is all. Press the Close button.
- Have the other user, you shared the trading account with, in their installation of Sierra Chart select Global Settings >> Data/Trade Service Settings.
- Set the Current Selected Service to Trading Evaluator [trading] or Trading Evaluator - Delayed [trading] depending upon which service you are using.
- Press the OK button.
- They will then have access to the Trade Account you shared.
Account Balance Adjustments
It is supported to perform credit and debit transactions on the Account Balance of your simulated trading account.
If a trading account has been shared to you, and you are not the authorized user of the account, then you cannot adjust account balances. Only authorized users on a trading account can adjust the account balance.
Follow the instructions below to perform credit and debit transactions.
- Go to Sierra Chart and select Trade >> Trade Account Monitor.
- Left click on the line in the list, the account you want to adjust the balance for.
- On the Trade Account Monitor window menu, select Balance >> Adjust Account Balance.
- Enter a positive number to increase the balance. Enter a negative number to decrease to balance.
- Press OK.
- The adjustment goes into effect immediately. You will see the adjustment reflected on the line in the Trade Account Monitor window for the Trade Account.
Margin Requirement Adjustments
It is supported to adjust the required exchange margin requirement when submitting an order. This can be important because there needs to be a sufficient Account Balance to be able to submit an order to cover the required margin.
Follow the instructions below to adjust this.
- Select Trade >> Trade Accounts Monitor.
- In the list of accounts, select the account you want to edit.
- From the Trade Accounts Monitor window, select Manage >> Edit Trade Account.
- On the Main tab in the Margin Settings section, set Use Percent of Margin Requirement to the percentage of the exchange specified margin requirement to actually use. 100 will use the exchange specified margin. 50 will use 50% of the exchange specified margin.
- Press the Commit button to save the change to the server.
Deleting Trade Account
It is supported to delete a Trade Account that you no longer require.
Deleting a trade account, does not cancel any open orders for that account, it does not close any Positions for that account, and it does not delete any order activity and fill activity history.
The history is still maintained on the server and you can re-create the Trade Account at any time to access the history. However, from time to time Sierra Chart may delete order and fill history from the server that is more than two years old.
Follow the instructions below to delete a Trade Account.
- Select Trade >> Trade Accounts Monitor.
- In the list of accounts, select the account you want to edit.
- From the Trade Accounts Monitor window, select Manage >> Edit Trade Account.
- Select the Manage Trade Account tab from the menu at the top.
- Click on the Delete Trade Account button text twice in the right column.
- You will receive a prompt, to confirm. Press Yes to confirm.
- You will receive another prompt to confirm. Press Yes to confirm.
- When the account is deleted, there will be a confirmation prompt. Press OK.
Web-Based Trading Panel
The Sierra Chart Simulated Trading Service has a web-based trading panel.
For complete documentation and details about this Trading panel, refer to Sierra Chart Order Routing Service Web-based Trading Panel. The simulated trading service web-based trading functions the same as the Live order routing service trading panel.
Using Internal Sierra Chart Trade Simulation Mode
When using the Sierra Chart server-based Simulated Trading Services, all trading and tracking of trade activity is through a remote server. This is to provide a highly realistic trading environment and to ensure there is no modification of trading activity and to allow a trading evaluator to monitor your activity (if applicable).
Therefore, it is not possible to use the internal Trade Simulation Mode when using these services unless you are doing a chart replay.
When performing a chart replay it is possible to enable Trade >> Trade Simulation Mode On. If this command is enabled, then to disable it, remove the checkmark by this command.
To use Sierra Chart Trade Simulation Mode in all cases, follow the instructions below.
- Select Global Settings >> Data/Trade Service Settings.
- Set the Current Selected Service to SC Data - All Services.
- Press OK.
- Open your Chartbook with File >> Open Chartbook if it is not already open.
- Translate the symbols in the ChartbookEdit >> Translate Symbols to Current Service.
- You will now be able to enable Trade >> Trade Simulation Mode On.
Accessing Real-time Data
The simulated trading service supports both delayed data and real-time data. Delayed data is available for the CME, CBOT, NYMEX, COMEX, exchanges.
Delayed data is provided when the Global Settings >> Data/Trade Service Settings >> Current Selected Service is set to Trading Evaluator - Delayed.
For real-time data you will need to use the Denali Exchange Data Feed and set Global Settings >> Data/Trade Service Settings >> Current Selected Service to Trading Evaluator.
To take advantage of the lower cost nonprofessional CME Group market data exchange fees, if you are a nonprofessional, then refer to the Easy Solution to CME Funded Trading Account Requirement.
Using Delayed Data with Real-time Trading Evaluator
When you have set Global Settings >> Data/Trade Service Settings >> Current Selected Service to Trading Evaluator and not to Trading Evaluator - Delayed, and you are not using the Denali Exchange Data Feed and paying the required exchange fees for real-time data, then the order fill prices you receive will be according to real-time data.
This means that you will see a mismatch between the current market data price you see in the chart, and the order fill price and the Trade Position line at the time of the fill.
You will also notice that orders do not fill when expected since you are seeing delayed prices in the chart but the orders are filled according to real-time data. You can also see the opposite condition where an order fills when you would expect it would not.
To solve these problems, you need to set Global Settings >> Data/Trade Service Settings >> Current Selected Service to Trading Evaluator - Delayed.
*Last modified Thursday, 26th December, 2024.