Study Collections
- Introduction
- Create a Study Collection
- Applying a Study Collection to a Chart
- Automatically Applying a Study Collection to New Charts
- Adding a Study Collection Without Clearing Existing Studies On The Chart (Prompt to Remove Existing Studies)
- Delete a Study Collection
- Quickly Clearing All Studies from a Chart
- Study Collection Files
- Modify a Study Collection
- Linking Studies Between Charts
- Sharing a Study Collection File
- Combining Study Collection Files
- Using a Study Collection Provided by Sierra Chart Support
- Opening Older Study Collections
- Control Bar Study Collection Buttons (Opens in a new page)
- Keyboard Shortcuts for Study Collections (Opens in a new page)
Introduction
A Study Collection is a saved collection of one or more studies and their settings, that can be added to a chart with one step from the Analysis menu.
The Study Collection feature allows you to quickly switch between different study configurations which you have previously saved.
Create a Study Collection
Follow the below instructions create a Study Collection.
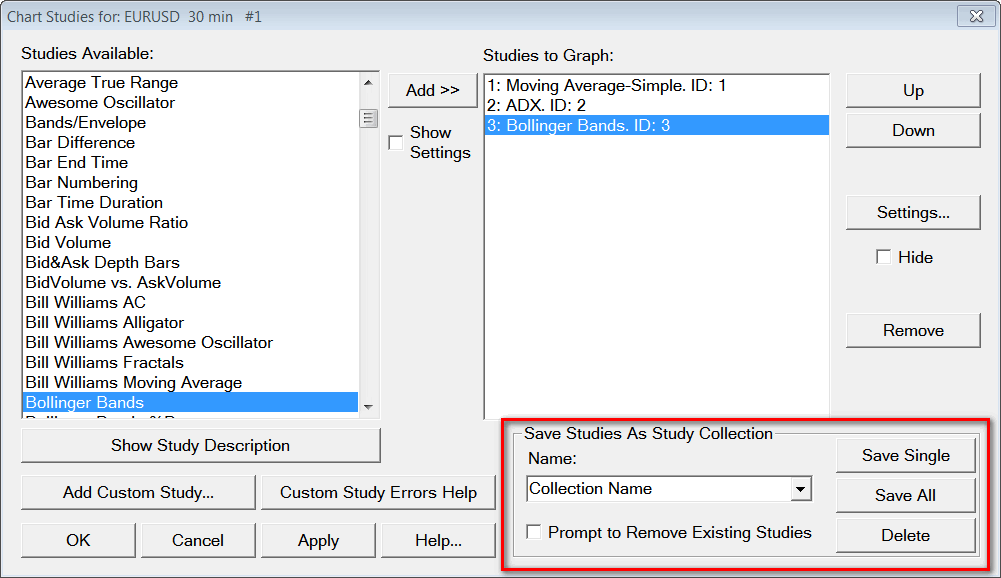
- Open the Chart Studies window by selecting Analysis >> Studies on the menu.
- Type the name that you want to use for the Study Collection in the Save Studies As Study Collection >> Name edit box in the Chart Studies window. Or, select an existing name from that list.
- Enable the Prompt to Remove Existing Studies option if you want to be prompted to remove the existing studies on the chart when applying the Study Collection to the chart rather than the existing studies on the chart being automatically removed. For more information, refer to Adding a Study Collection Without Clearing Existing Studies On The Chart (Prompt to Remove Existing Studies).
- Press the Save All button to save all the studies using the name entered or selected.
- Or press the Save Single button to save the study selected in the Studies to Graph list, using the name entered or selected.
- Sierra Chart will ask you to confirm the name you want to save studies as. Press Yes to confirm.
- Press the OK button in the Chart Studies window.
- You can modify the studies or the settings in a Study Collection at any time and then just save it again using the same name. There is no limit to the number of Study Collections you can save. However, there is a limit to the number of Study Collections which will be listed on the Analysis menu.
Applying a Study Collection to a Chart
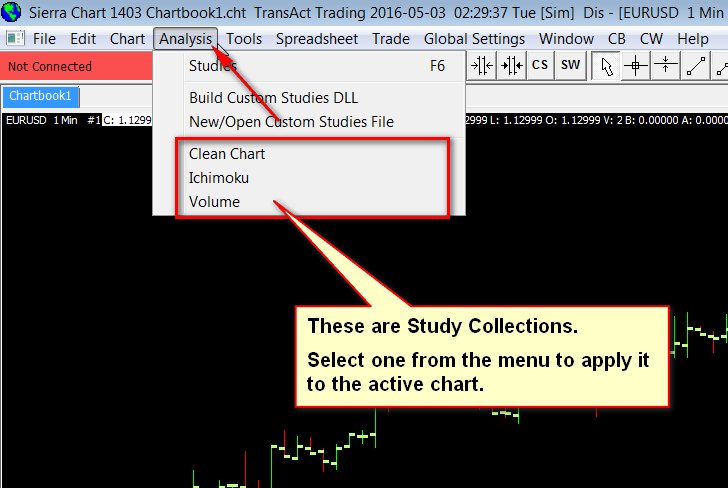
Select the name you saved it as from the list on the Analysis menu. This menu is on the Sierra Chart main window.
Automatically Applying a Study Collection to New Charts
To automatically apply one of your saved Study Collections to newly opened charts: go to Global Settings >> General Settings on the menu. Make sure the Use Default Study Collection check box is checked and select your saved Study Collection from the list. Press OK.
Adding a Study Collection Without Clearing Existing Studies On The Chart (Prompt to Remove Existing Studies)
If you want apply a Study Collection to the chart and not clear the existing studies from the chart, then check the Save Studies As Study Collection >> Prompt to Remove Existing Studies checkbox before saving the Study Collection with Save All or Save Single.
For instructions to create a Study Collection, refer to Create a Study Collection.
When enabling this option, a plus sign (+) is appended to the Study Collection name. When applying a Study Collection that was saved with this option, then Sierra Chart will ask whether or not to clear existing studies from the chart.
Using this method you are able to apply one or more Study Collections to a chart without removing or clearing the existing studies. Each time you apply a new Study Collection, press No when prompted, to not clear the existing studies.
Delete a Study Collection
Follow the instructions below to delete a Study Collection file that is already existing. This will remove it from the Analysis menu.
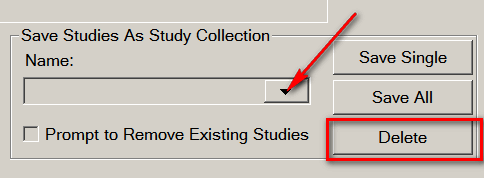
- Select Analysis >> Studies on the menu.
- Select the existing Study Collection name from the Save Studies as Study Collection >>Name list box.
- Press the Delete button to delete the Study Collection.
- A backup of the Study Collection file prefixed by the Date-Time of deletion, is placed into the Backups subfolder in the Sierra Chart installation folder so that it can be restored if needed.
- Also be aware that if the Study Collection file was provided from the Sierra Chart server for your account, then next time you restart Sierra Chart, that file will be downloaded again. These file downloads can be disabled.
Quickly Clearing All Studies from a Chart
To quickly and easily clear all studies from a chart select Analysis >> Clean Chart on the menu. The studies will no longer be listed in the Chart Studies window.
If you want to reapply the studies which were previously on the chart, you first needed to have saved those studies as a Study Collection and then you can select the Study Collection name from the Analysis menu.
Study Collection Files
Study collections are stored in files with the file extension stdycllct. They are stored in the Data Files folder which is set in the Global Settings >> General Settings window. If you move that folder, then be sure to set its location in the General Settings window so the files can be found by Sierra Chart.
If you want to share a Study Collection file or copy it to another computer, then simply copy the Study Collection file that has the extension stdycllct, to the Data Files Folder of the other copy of Sierra Chart where it will be used.
Modify a Study Collection
These steps explain modifying an existing Study Collection.
- Apply the Study Collection to the chart by selecting the Study Collection name directly from the Analysis menu. Refer to the image below.
- After the Study Collection has been applied to the chart, select Analysis >> Studies on the menu.
- Add, Remove, or modify the studies as you require. For instructions, refer to Adding/Modifying Chart Studies.
- In the Save Studies As Study Collection frame, make sure the Name is set to the name of the Study Collection that you want to update. If it is not, select the name from the list of Study Collection names.
- Enable the Prompt to Remove Existing Studies if you want to receive a prompt to remove existing studies on the chart when you apply the Study Collection to the chart, rather than having them automatically removed.
- Press the Save All button.
Linking Studies Between Charts
It is supported to link the studies between charts that use the same Link Number so that when a study is changed on one of the charts, the other linked charts will have their studies set to be identical. This linking also applies to when applying a Study Collection a chart.
For further information, refer to Chart Linking.
Sharing a Study Collection File
Follow the below instructions to share or copy a study collection file to another user or to another installation of Sierra Chart.
- Determine the Sierra Chart Data Files Folder by selecting Global Settings >> General Settings. Make a note of the Data Files Folder.
- Navigate to the Data Files Folder through the operating system file manager window.
- Locate that particular study collection file that you want to share. The name of it will be the same name that you see on the Analysis menu. The file extension will be stdycollct.
- Make a copy of the file.
- Determine the Sierra Chart Data Files Folder in the destination copy of Sierra Chart where you want to copy the Study Collection file to, by selecting Global Settings >> General Settings. Make a note of the Data Files Folder.
- Save the study collection file into the Data Files Folder in the destination copy of Sierra Chart.
- Once the file is saved in the destination copy of Sierra Chart, it can be selected from the Analysis menu when a chart is active.
Combining Study Collection Files
Follow the below procedure to combine 2 study collection files into one.
- Make sure both of the study collections are saved using the Prompt To Remove Studies option. For instructions for this, refer to the Adding a Study Collection Without Clearing Existing Studies On The Chart (Prompt to Remove Existing Studies) section on this page.
- Apply one of the Study Collections to the chart from the Analysis menu. For instructions, refer to Applying a Study Collection to a Chart. When prompted whether to remove the existing studies on the chart, press Yes.
- Apply the other Study Collection to the chart from the Analysis menu. For instructions, refer to Applying a Study Collection to a Chart. When prompted whether to remove the existing studies on the chart, press No.
- Now all of the studies from both Study Collections are on the chart. At this point you need to save all of the studies as a new Study Collection. For instructions, refer to Create a Study Collection.
Using a Study Collection Provided by Sierra Chart Support
Follow the instructions below to save a Study Collection from the Support Board which has been provided by Sierra Chart support or another user.
- Go to the message thread on the Support Board which contains the posting which has an attached Study Collection file. Refer to the image below.
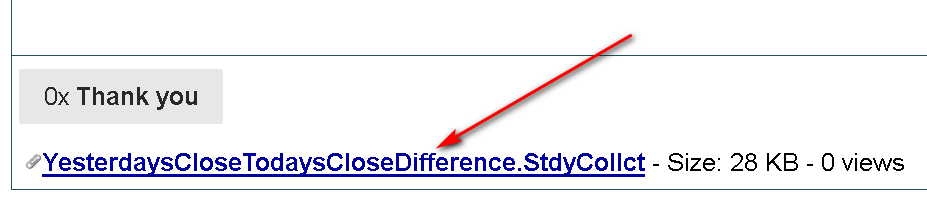
- Left click on the Study Collection file name at the bottom of the posting which has a StdyCollct file extension.
- Your web browser should prompt you for the location to save this file. It needs to be saved to the Sierra Chart Data Files Folder.
To determine the location of the Data Files Folder, select Global Settings >> General Settings. Look in the Data Files Folder box. This is where you need to save the Study Collection file from your web browser. Refer to the image below.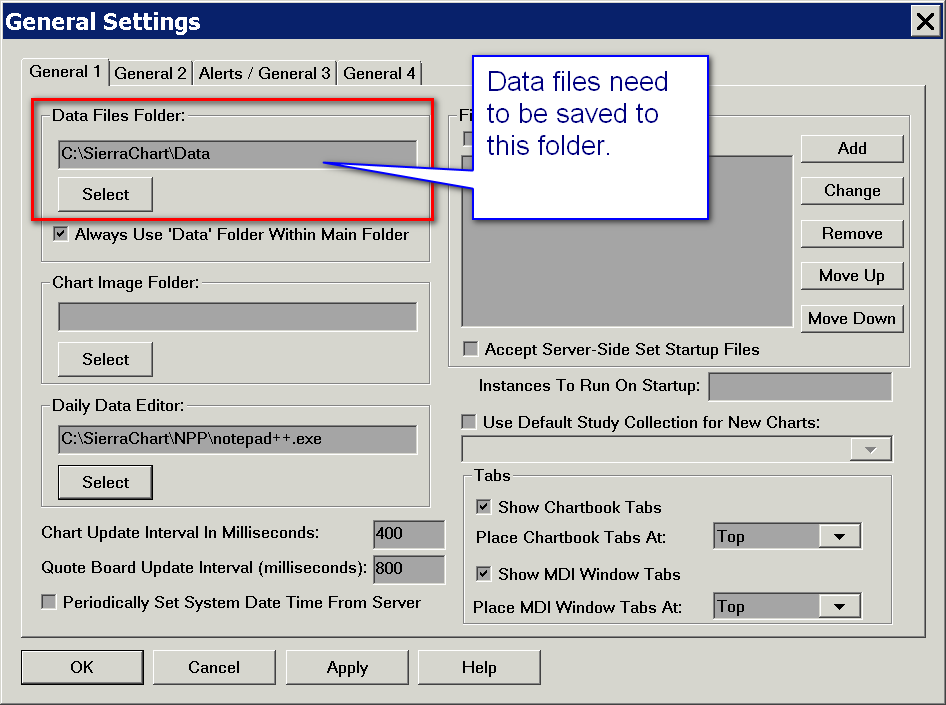
- Go to Sierra Chart and select the name of the Study Collection file on the Analysis menu. It will then be applied to the active chart.
- To modify any of the studies in the Study Collection, refer to Adding/Modifying Chart Studies.
Opening Older Study Collections
Effective with version 2364 and higher, you are not able to open Study Collections saved in versions more than about two years ago before this version. They are not compatible. You will receive an error message in the Sierra Chart Window >> Message Log indicating this.
Therefore, if you want to open a Study Collection, saved more than two years ago in a version at or after 2364, means that you first need to roll back to version 2363 following the Full Control Rollback Procedure.
Re-save the Study Collection in this version by following the Modify a Study Collection instructions.
Update to the the latest version of Sierra Chart with Help >> Download Current Version.
You can then open the Study Collections in newer versions.
*Last modified Wednesday, 22nd February, 2023.