Alerts Manager
- Introduction
- Alerts Log
- Symbol Alerts
- Time Alerts
- Alerts Manager Controls
- File >> Save Log to File
- File >> Always on Top
- File >> Close
- Edit >> Edit Alert
- Edit >> Delete Alert
- Edit >> Delete All Alerts
- Edit >> Delete Completed Alerts
- Edit >> Enable Alert
- Edit >> Disable Alert
- Edit >> Clear Log
- Edit >> Copy Selection
- Edit >> Copy Symbols
- Edit >> Customize Columns
- Edit >> Auto Set Alert Text Column Width
- Edit >> Close Window When Goto Chart
- Alerts >> Add Symbol Alert
- Alerts >> Add Time Alert
- Alerts >> MuteAllAlertSounds
- Alerts >> Alert Log Descending Display Order
- Alerts >> Goto Chart Goes To Date-Time
- Goto Chart
- Log
- Symbol Alert
- Time Alert
- Font Type and Size
- Troubleshooting Symbol Alerts
- Disabling Alert Sounds
Introduction
The Sierra Chart Alerts Manager is opened by selecting Window >> Alerts Manager on the menu.
It contains 3 different tabs. Each of them are documented below.
Alerts Log
To open the Alerts Log, select Window >> Alerts Manager >> Alerts Log.
The Alerts Log tab lists Simple Alert and Spreadsheet System/Alert messages which contain detailed information given when an Alert Condition Formula has become TRUE.
Other events, like trading events and automated trading signals which trigger an alert are also added to the Alerts Log.
When the last line is selected in the Alerts Log, and a new Alert Message is added, the log will automatically be scrolled to the newly added line to the Alerts Log. Therefore, it is recommended to keep the last line selected so that the new Alert Message lines will be visible when they are added.
To prevent the Alerts Log from opening automatically when a study or chart alert event occurs, then uncheck Global Settings >> General Settings >> Alerts >> Show Alerts Log On Study Alert.
Refer to the Alerts Manager Controls section for the available commands to use with the Alerts Log.
Symbol Alerts
To open the Symbol Alerts tab, select Window >> Alerts Manager >> Symbol Alerts.
A Symbol Alert is an alert condition set on a particular Symbol and uses the Current Quote data for the symbol to trigger the alert.
The Symbol Alerts tab lists all of the configured Symbol Alerts.
Sierra Chart must be connected to the configured data feed to access streaming quote and trade data for the Symbol with the configured Symbol Alert which is necessary to evaluate this alert. When Sierra Chart is not running or it is disconnected from the data feed, Symbol Alerts will not be evaluated.
Add Symbol Alert
A Symbol Alert is an alert condition set on a particular Symbol and uses the Current Quote data for the symbol to trigger the alert. Therefore, it only works when connected to the data feed (File >> Connect to Data Feed).
Due to the reliance on the Current Quote data, Symbol Alerts will not function properly during a replay.
To add a new Symbol Alert, follow the instructions below:
- Select Chart >> Add Symbol Alert.
- Or, right click on a chart at the price level that you want to set the alert at and select Add Symbol Alert. To add this command to the Chart Shortcut Menu if it is not already listed, refer to Customize Chart Shortcut Menu.
The Value field in the Add Symbol Alert window will be set to the price level you right-clicked at on the chart. - Or, select Alerts >> Add Symbol Alert on the Quote Board or Study Summary windows.
- Or, open the Alerts Manager window by selecting Window >> Alert Manager and select the Symbol Alert tab. Select the Alerts >> Add Symbol Alert menu command. Alternatively, right click on any cell and select New Alert.
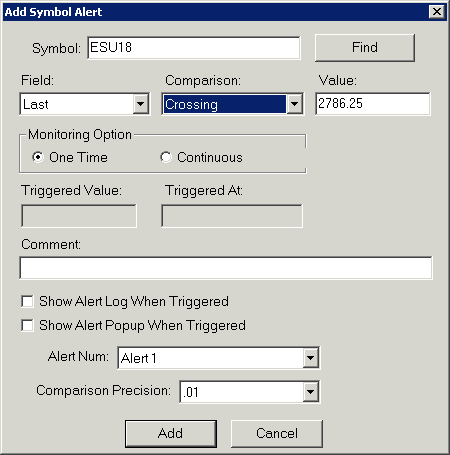
- Once the Add Symbol Alert settings window is open, set all of the settings as required. Most especially the Symbol if it is not already set. Press the Find button to look up the symbol.
- Press the Add button to add the Symbol Alert or press the Cancel button to not add it.
In order to modify or remove a Symbol Alert, select Window >> Alert Manager and select the Symbol Alerts tab. Right click on the alert to modify or remove and select Edit or Delete.
Alternatively, select the alert by left clicking on it and then select Edit >> Edit Alert, Edit >> Delete Alert, or Edit >> Delete All Alerts from the Alert Manager window. It is also possible to edit the alert by double left clicking on it in the Alerts Manager window.
To mute alert sounds including Symbol Alerts, enable Global Settings >> Mute All Alert Sounds. Or Alerts >> Mute all Alert Sounds on the Quote Board menu. Remove the check mark from this menu command to reenable alert sounds.
Symbol Alert Inputs
- Symbol: Enter the symbol for which the alert is to be created.
- Find: Selecting this button brings up the Find Symbol window. A symbol from the list can be selected and used for the alert.
- Field: Select one of the following options as the item to be tested for the alert.
- Open: The Open value of the Current Quote Data for the symbol.
- High: The High value of the Current Quote Data for the symbol.
- Low: The Low value of the Current Quote Data for the symbol.
- Last: The Last value of the Current Quote Data for the symbol.
- Volume: The Volume of the Current Quote Data for the symbol.
- # Trades: The Number of Trades of the Current Quote Data for the symbol.
- OHLC Avg: The Average of the Open, High, Low, and Close (Last) of the Current Quote Data for the symbol.
- HLC Avg: The Average of the High, Low, and Close (Last) of the Current Quote Data for the symbol.
- HL Avg: The Average of the High and Low of the Current Quote Data for the symbol.
- Comparison: Select one of the following options as the comparison operator for the alert.
- Crossing: The alert checks if the selected Field item is crossing the amount set in the Value Input, either from above or from below.
- Above: The alert checks if the selected Field is above (greater than) the amount set in the Value Input.
- Below: The alert checks if the selected Field is below (less than) the amount set in the Value Input.
- Equal To: The alert checks if the selected Field is equal to the amount set in the Value Input.
- Crossing or Equal To: The alert checks if the selected Field is crossing the amount set in the Value Input, either from above or from below; or if the selected Field is equal to the amount set in the Value Input.
- Above or Equal To: The alert checks if the selected Field is above (greater than) or equal to the amount set in the Value Input.
- Below or Equal To: The alert checks if the selected Field is below (less than) or equal to the amount set in the Value Input.
- Value: Enter the value for the alert to check against. If the Add Symbol Alert page was accessed through the right click menu, then this value will be filled in with the value at the level where the mouse was clicked on the chart.
- Monitoring Option: Select one of the two options for this section.
- One Time: The alert will only trigger once. After it is triggered the alert becomes disabled.
- Continuous: The alert will continually monitor the data and change between True and False depending on the selected options.
Note that like all other Alerts, it is necessary for this alert to become False before it can trigger a new True state. For example, if the alert is set to check if the Last is Above a value of 2700.00, then when the Last goes over 2700.00 the alert becomes True. As long as the Last stays above 2700.00, the alert stays True and does not continually trigger a new True state with each update.
- Triggered Value: When a Symbol Alert is setup and has a Monitoring Option of One Time, this field displays the value at which the alert went True. Otherwise, this field is blank.
- Triggered At: When a Symbol Alert is setup and has a Monitoring Option of One Time, this field displays the time at which the alert went True. Otherwise, this field is blank.
- Comment: Text entered into this field is displayed in the Comment column of the Symbol Alerts tab of the Alert Manager window.
- Show Alert Log When Triggered: If this option is enabled, then when the Symbol Alert is triggered as True, then the Alert Manager window will be displayed.
- Show Alert Popup When Triggered: If this option is enabled, then when the Symbol Alert is triggered as True, a popup window is displayed with information on the alert.
- Alert Num: This defines the Alert Number to be used when the Symbol Alert is triggered as True. For more information, refer to Alert Settings.
- Comparison Precision: This is the precision that is used when making the comparison between the selected Field and the entered Value. Any data that is less than this Comparison Precision is ignored during the comparison.
- Enable/Change: This button either Enables the alert or invokes any Changes that have been made to the alert. The particular wording displayed depends on the state of the alert at the time that the Enable/Edit/Add Alert Symbol window is opened. If the alert has not been created previously, or if the alert is in a Disabled state by having already triggered in a One Time condition, then the button will state Enable. Otherwise, the button will state Change.
- Cancel: This button will cancel all changes made to the Enable/Edit/Add Alert Symbol window.
Viewing, Editing, Deleting or Disabling Symbol Alert
All of the existing added Symbol Alerts, can be edited, deleted or disabled by following the instructions below.
- Select Window >> Alert Manager >> Symbol Alerts.
- Right-click over the particular Symbol Alert you want to edit, delete or disable.
- The menu will display. Select one of the following: Edit, Delete, Disable.
Time Alerts
To open the Time Alerts tab, select Window >> Alerts Manager if it is not already visible. Select the Time Alerts tab.
The Time Alerts tab lists all of the configured Time Alerts. To add a Time Alert, go to the Time Alerts tab. Press the Add Time Alert button. Set all of the fields as you require. Press the Add button when done. You should now see it listed on the Time Alerts tab.
When right clicking with your Pointer on an existing Time Alert in the Time Alerts list, you are able to Edit, Delete, Disable, the Time Alert.
The Alert Time and Alert Date need to be relative to the global Time Zone setting in Sierra Chart.
On the Add Time Alert window, when you have enabled Show Alert Pop up when Triggered, there will be a pop-up window displayed when the particular time event has been triggered. If this pop-up window is not visible when you expect to see it, then select Window >> Reset Windows. It will be visible next time.
Alert Manager Controls
The following lists descriptions of the various menu commands available on the Alerts Manager.
File >> Save Log to File
When this command is selected, the current contents of the Alerts Log will be saved to a file. Enter or choose a file name and press the Save button.
File >> Always on Top
When this option is enabled, the Alerts Manager window remains on top of other windows.
File >> Close
This command closes the Alerts Manager window.
Edit >> Edit Alert
This command is only enabled when a Symbol Alert or Time Alert is selected on the Symbol Alert or Time Alert tabs.
This command opens the Settings Window for the selected alert to allow you to edit its settings.
Edit >> Delete Alert
This command is only enabled when a Symbol Alert or Time Alert is selected on the Symbol Alert or Time Alert tabs.
This command deletes the selected Symbol Alert or Time Alert.
Edit >> Delete All Alerts
This command is only enabled when the Symbol Alert or Time Alert tab is selected.
This command deletes all of the Symbol Alerts or Time Alerts, depending upon which tab is selected.
Edit >> Delete Completed Alerts
This command deletes all of the completed Symbol Alerts. This only applies to Symbol Alerts.
Edit >> Enable Alert
This command is only enabled when the Symbol Alert or Time Alert tab is selected, and there is a selected disabled Symbol Alert or Time Alert.
This command enables the selected Symbol Alert or Time Alert.
Edit >> Disable Alert
Edit >> Clear Log
This button will clear the contents of the Alerts Log permanently. You will be prompted to confirm.
Edit >> Copy Selection
This command copies the selected alert message lines on the Alerts Log tab to the system clipboard. After this you can paste the contents into another program.
Edit >> Copy Symbols
This menu command only applies to the Alerts Log tab. This command will create a list of the symbols from each of the alert message lines that are selected and put them on the system clipboard. Each symbol will be on its own line.
Edit >> Customize Columns
This menu command applies to the Symbol Alerts and Time Alerts tabs only.
Select this command to open the Customize Symbol/Time Alerts Tab Columns window to Add, Remove, Move Up, Move Down columns for these tabs.
Edit >> Auto Set Alert Text Column Width
This menu command applies to the Alerts Log tab only.
When it is enabled, then the Alert Text column width is automatically set based upon the maximum size of the text among all of the rows in the Alert Text column.
Edit >> Close Window When Goto Chart
Alerts >> Add Symbol Alert
Alerts >> Add Time Alert
Alerts >> Mute All Alert Sounds
Alerts >> Alert Log Descending Display Order
When Alert Log Descending Display Order is enabled, then the most recent alert message according to its Date-Time, will be displayed at the top and messages below will be in descending order.
Otherwise, the messages will be in an ascending order according to their Date-Time, from top to bottom.
Alerts >> Goto Chart Goes to Date-Time
When Goto Chart Goes to Date-Time is enabled, then when using the Goto Chart command, the chart will be scrolled to the Date-Time of the alert occurrence.
When Goto Chart Goes to Date-Time is disabled, then no scrolling of the chart will occur when going to the chart associated with the alert.
Goto Chart
This command only applies to the Alerts Log tab.
If an alert message is selected in the Alerts Log, the Goto Chart command will open the chart that has given this alert message. If the chart has been changed to a different symbol, the chart will be changed back to the symbol that triggered the alert.
When Alerts >> Close Window when Goto Chart is enabled, then the Alerts Manager window will be closed when selecting the Goto Chart command.
When Alerts >> Goto Chart Goes to Date-Time is enabled, then when selecting the Goto Chart command when the Alerts Log tab is selected in the Alerts Manager, the chart the alert originated from will be scrolled to the Date-Time the Alert Condition became TRUE at.
The chart will be scrolled so that the last bar is at that particular Date-Time. To go back to the end of the chart, press the End key on your keyboard, use the scrollbar to go back to the end of the chart, or select Chart >> Goto End of Chart.
Log
This command selects the Log tab on the Alert Manager. The Log tab contains all alert messages.
Symbol Alert
This command selects the Symbol Alert tab on the Alert Manager.
Time Alert
This command selects the Time Alert tab on the Alert Manager.
Font Type and Size
To change the Font Type and Size of the text in the Alerts Manager, select Global Settings >> Graphics Settings >> Other >> Text Windows Font>> Select from the menu.
The Font window will open. Choose the Font, Font Style, and Size and press OK.
Troubleshooting Symbol Alerts
Follow the instructions below to troubleshoot a problem where Symbol Alerts are not triggering or not giving a sound.
- Review the Settings of each Symbol Alert that is not working and make sure they are correct. To do this, select Window >> Alerts Manager >> Symbol Alert. Select a symbol alert line. Right-click on that line and select edit. Make sure the Comparison Precision setting is correct.
- Make sure that Sierra Chart is connected to the data feed with File >> Connect to Data Feed.
- Make sure there is data available from the data feed for a particular Symbol Alert by monitoring the quote data for it through the Quote Board.
- If you are not receiving a sound for the Symbol Alert, then refer to Troubleshooting Alert Sounds.
Disabling Alert Sounds
Alert sounds that you hear can come from the Alert Condition Formulas defined on the main price graphs and are set through Chart >> Chart Settings >> Alerts, from Studies, Chart Drawings from drawing Tools, from Trading events, or data feed connection and disconnections.
Below is the Alerts Log showing Alert Messages. To open the Alerts Log, select Window >> Alerts Manager >> Log.
Globally Mute Alert Sounds
To globally mute (prevent from playing) all alert sounds, check the menu option Global Settings >> Mute All Alert Sounds. Uncheck this menu option to un-mute the sounds.
Disabling Alert Sounds from Studies
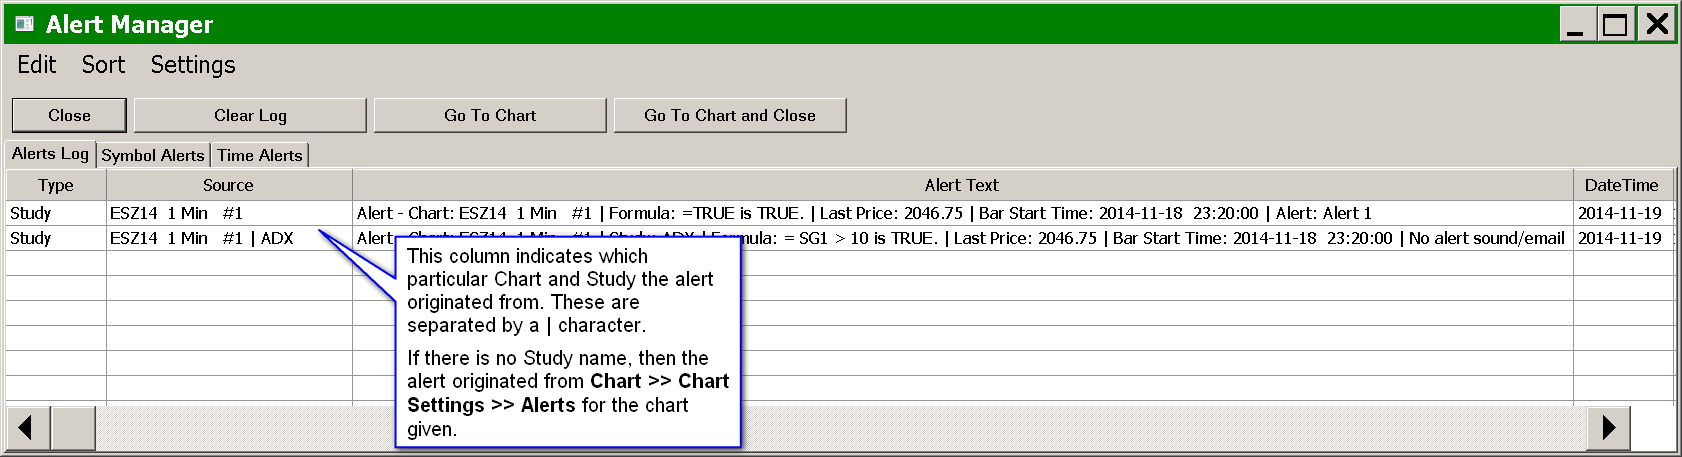
To disable alert sounds from studies, select Window >> Alerts Manager >> Alerts Log.
The Source column will indicate the particular source Chart and study the Alert Message is from. The Chart Number (#) is also given. After the | character, the name of the Study is given.
Once you know the particular Chart and Study the alert is from, then go to the chart where the Alert Message originated from.
Select Analysis >> Studies on the menu. Open the Study Settings window for the specific study, that is given in the Alerts Log Source column, that the Alert Message originated from.
Select the Alerts tab. Set the Alert Sound to No Alert or uncheck the Enabled option.
Press the OK button to close the Study Settings window.
Disabling Alert Sounds for Main Price Graph
To disable alert sounds that are set through Chart >> Chart Settings >> Alerts for a chart, select Window >> Alerts Manager >> Alerts Log .
The Source column will indicate the particular source chart the alert is from. The Chart Number (#) is also given.
Go to the chart where the alert originated from. Select Chart >> Chart Settings >> Alerts. Set the Alert Sound setting to No Alert or you can remove the Alert Condition formula.
Disabling Alert Sounds for Chart Drawings
Alert Sounds can also originate from Chart Drawing Alerts that you have set up on Chart Drawings. A Chart Drawing is a drawing drawn by one of the drawing Tools from the Tools menu, like a Line .
Here is an example chart drawing alert message in the Window >> Alerts Manager >> Alerts Log: Chart Drawing Alert: 6EZ14 1 Min #2, Horizontal Line, Low (1.3300) Below line #80 (1.3320).
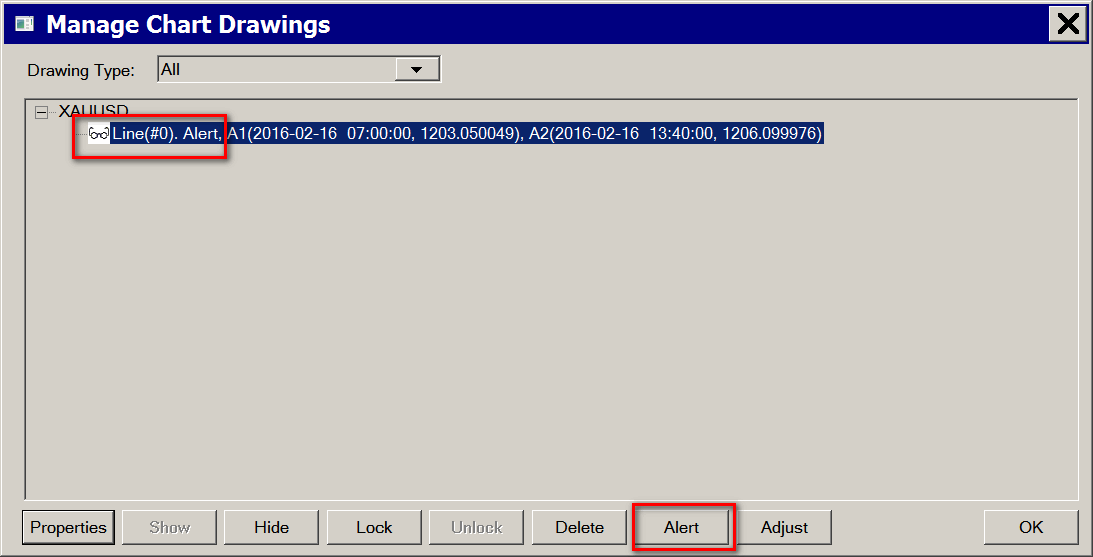
To find this chart drawing, select Tools >> Manage Chart Drawings Window. Find the Chart Drawing in the list. This Chart Drawing is #80. The list of Chart Drawings also has the drawing numbers to be able to find the corresponding drawing easily. Once you find the drawing in the list, press the Alert button. Uncheck the Enable Alert for Chart Drawing option to disable the alert.
Disabling Alert Sounds for Trading Events
To disable alert sounds for Trading events, select Trade >> General Trade Settings and set the Alert settings to No Alert.
Disabling Alert Sounds for Data Feed Connection Events
To disable alert sounds for Trading events, select Global Settings >> General Settings >> Alerts.
Set Server Connected Alert and Server Connection Lost Alert to No Alert Sound. Press OK.
Clearing Current Alert Sound Queue
There can be many alert sounds that have been triggered in Sierra Chart from one or more studies, which have been placed in the queue waiting to be played. In this case, you will be hearing sound after sound until the queue becomes empty.
To clear the alert sound queue, select Global Settings >> Clear Alert Sound Queue on the menu.
*Last modified Monday, 02nd June, 2025.