Spread Order Entry Study
Introduction
The Spread Order Entry Study supports entering spread orders. The number of legs supported is from 2 to 4.
When the specified Spread Entry Price is reached, then at that moment market orders are sent for each of the symbols specified through the Leg # Symbol Inputs. The Leg # Side Inputs specify the sides (Buy/Sell) and the Leg # Quantity Inputs specify the quantities.
So this is fully client-side managed and uses market orders for each of the legs.
Any combination of these Inputs can be used. A minimum of two symbols need to be specified to create the spread order.
This feature is not meant to be used from a Trading DOM. It is meant to be used from a standard chart.
If there is an exchange listed spread or strategy symbol available, and the Trading service you are using Sierra Chart with, supports trading these symbols, then there is no need to use the Spread Order Entry study feature. You should instead trade the exchange listed spread/strategy. To trade exchange listed spreads, it is recommended to use the SC Order Routing Service.
Step-by-Step Instructions
- Go to a chart and open the Trade Window for the chart. For instructions, refer to Opening Trade Window.
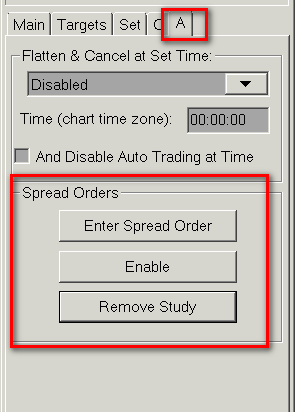
- On the Trade Window for the chart, select the A tab. Press the Enter Spread Order button. The Spread Order Entry study is now added to the chart and the Study Settings window will be opened for it.
- On the Settings and Inputs tab of the Study Settings window set the required parameters for the Spread Order.
At a minimum, the Inputs for Leg 1 Symbol, Leg 1 Side, Leg 1 Quantity, Leg 2 Symbol, Leg 2 Side, Leg 2 Quantity all need to be entered. This allows for the display of the Spread Price. - Select the Apply button to update the chart and have the Spread Price displayed. It is necessary to be connected to the real-time data feed to receive current data to see the Spread Price.
Connect with File >> Connect to Data Feed from the main menu if not already connected. You can get back to the Study Settings window through the Enter Spread Order button on the Trade Window. - Based on the most recent value for the Spread Price Subgraph at the bottom of the chart, enter a value for the Spread Entry Price to be used.
- Select a setting for the Spread Entry Price Operator Input to determine how Spread Entry Price is used in comparison to the actual Spread Price.
- If using the built-in Target and Stop orders in the study, then select Yes for the Use Target After Fill of Spread Entry and the Use Stop After Fill of Spread Entry Inputs. Enter appropriate values for the Target Spread Price and the Stop Spread Price.
- On the A tab of the Trade Window, select the Enable button.
It is also possible to right-click on the chart and select the option Enable Spread Order Entry to enable the monitoring of the spread price.
Study Inputs
- Is Active and Waiting for Spread Trigger Price: When this Input is set to Yes then the study is in an Enabled state and is monitoring for a match to either the Spread Entry parameters or to the Target and/or Stop parameters. Otherwise, the study is Disabled and is not actively checking for a match for these items and will not enter or exit any Orders.
- Leg 1 Symbol: This is the symbol for the first leg of the spread.
- Leg 1 Side: This is the position to take for the first leg of the spread. The possible values are Buy or Sell.
- Leg 1 Quantity: This is the quantity for the first leg of the spread.
- Leg 2 Symbol: This is the symbol for the second leg of the spread.
- Leg 2 Side: This is the position to take for the second leg of the spread. The possible values are Buy or Sell.
- Leg 2 Quantity: This is the quantity for the second leg of the spread.
- Leg 3 Symbol: This is the symbol for the third leg of the spread.
- Leg 3 Side: This is the position to take for the third leg of the spread. The possible values are Buy or Sell.
- Leg 3 Quantity: This is the quantity for the third leg of the spread.
- Leg 4 Symbol: This is the symbol for the fourth leg of the spread.
- Leg 4 Side: This is the position to take for the fourth leg of the spread. The possible values are Buy or Sell.
- Leg 4 Quantity: This is the quantity for the fourth leg of the spread.
- Spread Entry Price: This is the trigger price that is used in combination with the Spread Entry Price Operator to determine when market orders are sent for the specified symbols when this entry price is reached.
- Spread Entry Price Operator: This Input is used in combination with the Spread Entry Price to determine when the defined symbols are initially bought or sold. The following options are available:
- Less or Equal: The sending of market orders for the symbols will occur when the Spread Price is Less than or Equal to the Spread Entry Price.
- Greater or Equal: The sending of market orders for the symbols will occur when the Spread Price is Greater than or Equal to the Spread Entry Price.
- Number of Bars for Subgraphs: This Input controls how many bars across which each of the subgraphs will be drawn/kept. Note that when changing this value, the Spread Price subgraph will not update until there is an update to the Main Price Graph.
- Draw Zero Values: When this Input is set to Yes then subgraphs that have a value of 0 will be drawn. Otherwise, the subgraph will not be drawn when it has a value of 0. Note that this can become important in order to visualize the lines when one of the Spread Entry Price, Target Spread Price, or Stop Spread Price is intentionally set to a value of 0.
- Use Target After Fill of Spread Entry: When this Input is set to Yes then a Target trigger is monitored as part of the study at the price specified in the Target Spread Price after the fill of the Spread Entry. This Target order will close the open Spread Entry Positions when the Spread Price reaches the Target Spread Price.
- Target Spread Price: This Input is used in combination with the Use Target After Fill of Spread Entry to define a level at which a Target trigger will be placed.
- Use Stop After Fill of Spread Entry: When this Input is set to Yes then a Stop order trigger is monitored as part of the study at the price specified in the Stop Spread Price after the fill of the Spread Entry. This Stop order will close the open Spread Entry Positions when the Spread Price reaches the Stop Spread Price.
- Stop Spread Price: This Input is used in combination with the Use Stop After Fill of Spread Entry to define a level at which a Stop trigger will be placed.
Enabling/Disabling the Study
Since this study includes active monitoring of the prices against the entered values in order to determine when to take an action, it is necessary to either Enable or Disable this monitoring apart from placing the study on the chart.
Note that due to the timing of the display of the information in various windows, it is possible that one area of the program may show the monitoring Enabled and another that it is Disabled. A refresh of the windows that contain this information (closing the window and reopening it) should set the values appropriately. In addition, the text displayed with this study always give the correct state of the study.
This study has text that is displayed in the region of the chart in which the study is displayed. This text always give the most accurate information of the state of the study.
The following sections give information on how to Enable and Disable the study from various locations within the program.
Enable/Disable From Study Settings
The study Input Is Active and Waiting for Spread Trigger Price enables the monitoring when it is changed from No to Yes. Conversely, this disables the monitoring when it is changed from Yes to No.
The Study Settings page does not update when the study has been Enabled or Disabled from another location, and requires a refresh of the window in order to display the proper information. Nonetheless, the action of changing the value from No to Yes or from Yes to No will properly deal with the current state of the monitoring. For example, if the Trading: Spread Order Entry Settings window is displayed, and the monitoring is changed from Disabled to Enabled through another means, then the Input for Is Active and Waiting for Spread Trigger Price will still show a value of No. Changing this value, however, to Yes does not change the monitoring state, but leaves it as Enabled. If, however, the Input is then changed back to No, then the monitoring will be Disabled.
Enable/Disable from Trade Window
The Trade Window has special controls for this study on the A tab under the section for Spread Orders.
Depending on the state of the monitoring, there is a button that will show either Enable or Disable. Selecting the button when Enable is displayed, will enable the monitoring. Whereas, selecting the button when Disable is displayed will disable the monitoring.
For more information on these controls, refer to the Spread Order documentation for the Trade Window.
Enable/Disable with Shortcut Menu
When the Spread Order Entry study is on a chart, then the ability to Enable and Disable the study can be done by right clicking with your Pointer on the chart to display the chart shortcut menu.
In order to Enable or Disable the monitoring, simply right-click on the chart and the right click shortcut menu will display the options for Enable Spread Order Entry and for Disable Spread Order Entry. Depending on the state of the monitoring, only one of these options will be available.
If the monitoring is not active, then the option for Enable Spread Order Entry will be available on the right-click menu and the Disable Spread Order Entry will not be available. Selecting the Enable Spread Order Entry option will enable the monitoring of the Spread Order Entry study.
Conversely, if the monitoring is active, then the option for Disable Spread Order Entry will be available on the right-click menu and the Enable Spread Order Entry will not be available. Selecting the Disable Spread Order Entry option will disable the monitoring of the Spread Order Entry study.
*Last modified Friday, 20th January, 2023.