Settings Windows Interface
- Introduction
- Colors and Font Settings
- Changing Column Widths
- Working with Sierra Chart Settings Windows
- Common Features (Working with Sierra Chart Windows)
- Selection Specific Options (Working with Sierra Chart Windows)
- Pages (Working with Sierra Chart Windows >> Selection Specific Options)
- Item List (Working with Sierra Chart Windows >> Selection Specific Options)
- Value Field (Working with Sierra Chart Windows >> Selection Specific Options)
- Toggle Field (Working with Sierra Chart Windows >> Selection Specific Options)
- Button (Working with Sierra Chart Windows >> Selection Specific Options)
- Changing User Interface Behavior
- Keyboard Shortcuts
- Searching for Specific Settings
- New Chart Settings Window
- Settings Window Video
Introduction
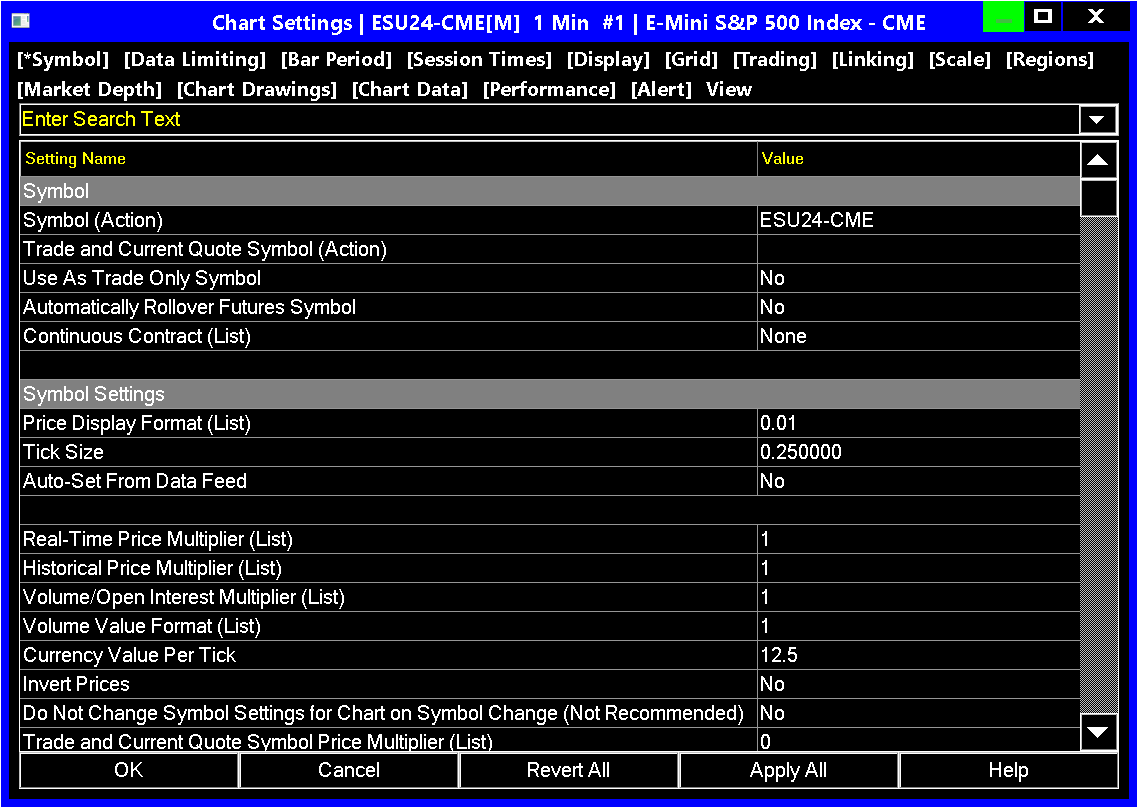
This page documents the user interface for the Settings type windows within Sierra Chart.
Watch the Settings Window Video.
For information about the new Chart Settings window, refer to New Chart Settings Window.
These new Settings type of windows are gradually replacing the old Microsoft Windows-based dialog windows which have proven to be unreliable, very inefficient, and operating system resource heavy. From a development and programming perspective these old dialog windows are very difficult to implement.
The new Settings Windows, are modeless, which means you can interact with other areas of Sierra Chart while one of these Settings Windows remains open. This is a major advantage.
These windows are resizable. So you can resize them as you require. The column widths in these windows are adjustable. The font and font colors can be customized. The colors of various elements of these windows can be customized. Adding, and reorganizing settings in these windows is much easier. These windows support easy translation to other languages. These windows are very fast and efficient and work reliably unlike the old Microsoft dialog windows which had numerous problems at the operating system level.
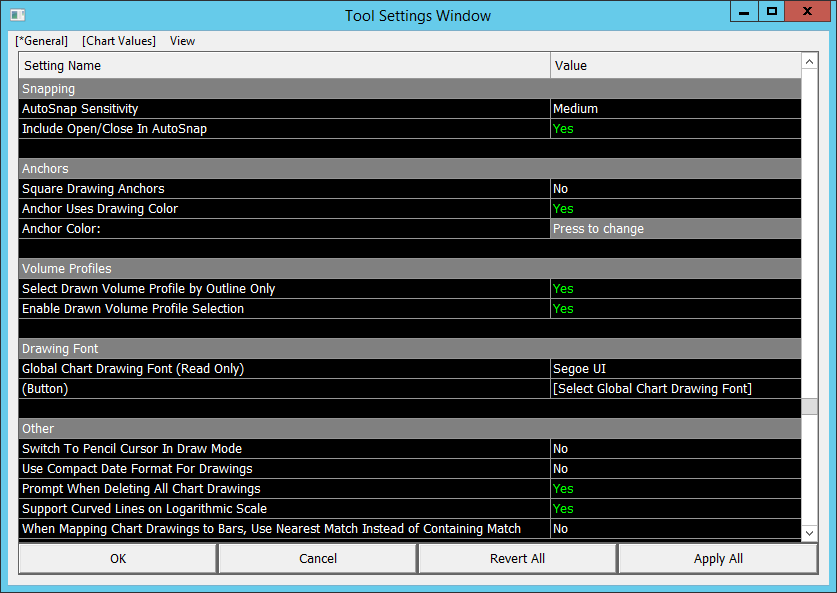
This is an example of one of the new settings windows:
Colors and Font Settings
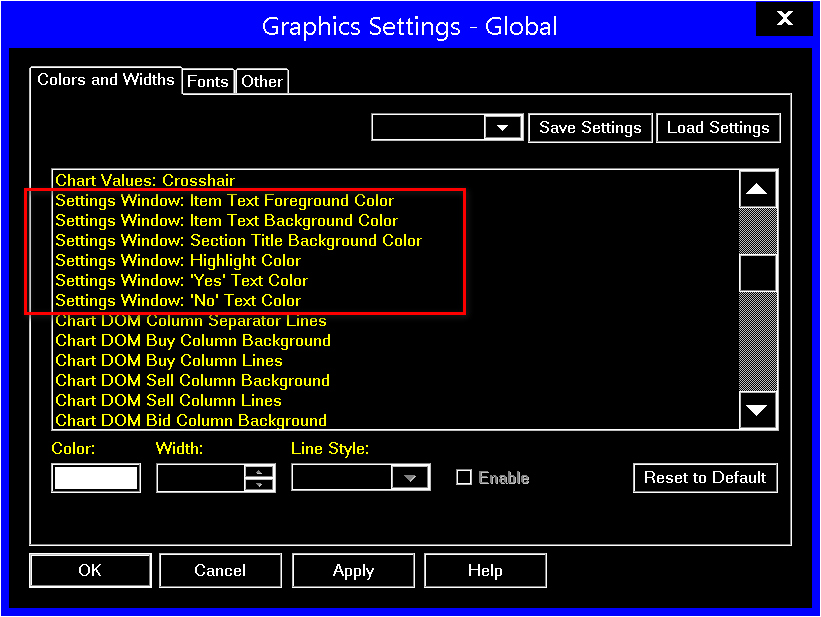
The colors of the items within Settings type of windows are fully configurable through Global Settings >> Graphics Settings >> Colors and Widths. The color settings begin with "Settings Window:". Refer to the image below.
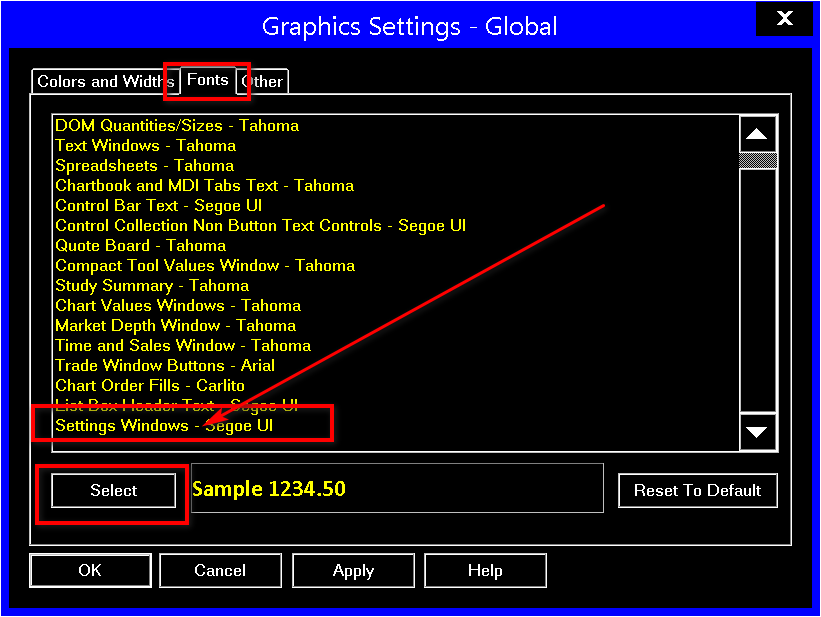
To change the Font and Font Size, select Global Settings >> Graphics Settings >> Fonts. Change the Settings Windows font. Refer to the image below.
Changing Column Widths
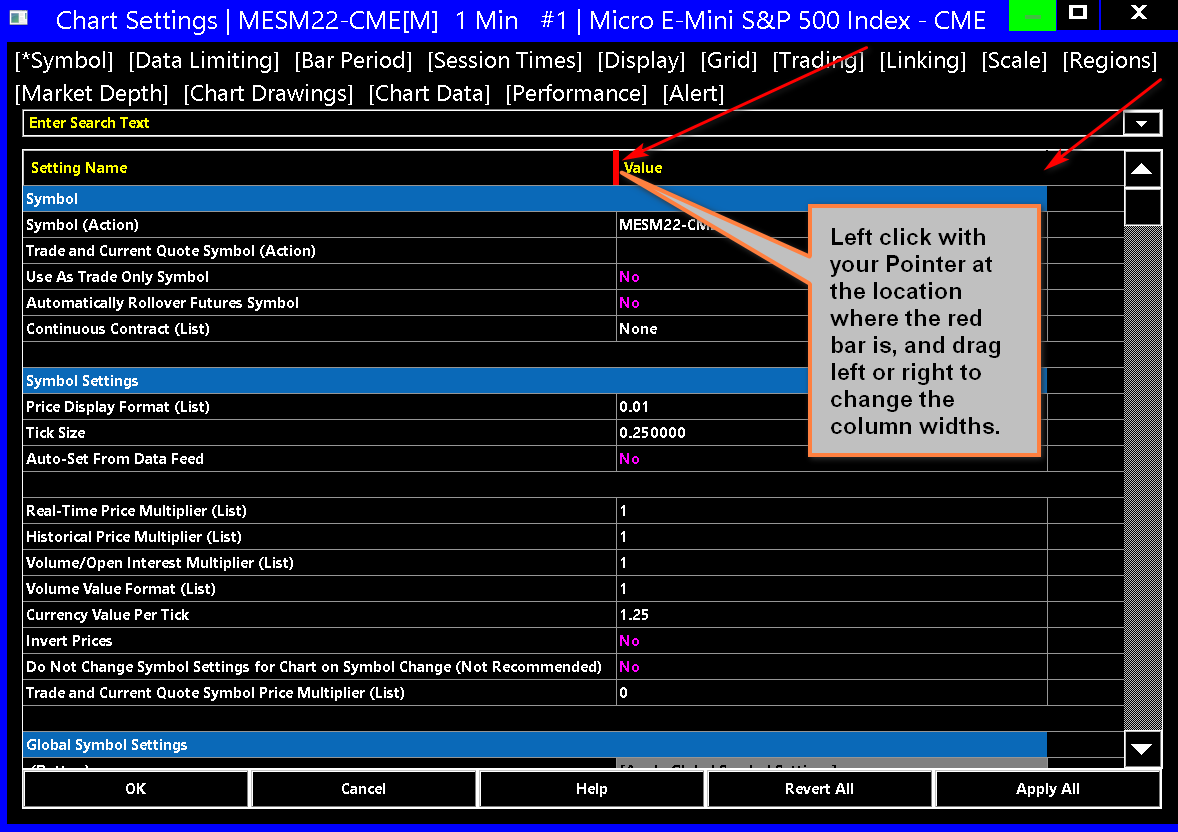
To change the widths of the columns in Settings Windows, Left click with your Pointer on the header line at the location of the dividing area between each column as shown in the image below.
While holding the left button down with your Pointer, drag left or right to change the width. When you have completed the width adjustment, release the Left button on your Pointer.
Working with Sierra Chart Settings Windows
Sierra Chart has implemented a new methodology for Dialog Windows in order to improve the user experience, and allow the software to be more independent from specific vendors and/or Operating Systems.
These new Windows are Modeless, which means that they can be displayed at any time and with any other window(s), and they will not interfere with the user interaction of any other window currently open in Sierra Chart, including the main Sierra Chart window.
Common Features (Working with Sierra Chart Windows)
The following list explains common menus and buttons.
- View >> Show Original Values: When this option is selected, a new column is displayed to the right of the Value column and will display the original value of the setting when it gets changed from its original value. This allows you to see the original value when making changes.
- OK: Selecting this button will accept the changes that have been made on the window and close the window.
- Cancel: Selecting this button will revert any changes that have been made on the window back to the last saved state and will close the window.
- Revert All: Selecting this button will revert any changes that have been made on the window back to the last saved state. This is the same action as Cancel, except that the window does not close when this button is selected.
- Apply All: Selecting this button will accept any changes that have been made on the window. This is the same action as OK, except that the window does not close when this button is selected.
- A and C Buttons: Items that require an entry (values, item selections, etc.) two buttons are displayed on the right of the entry named A and C. The following describes their functions:
- A: This button is optional. The A button accepts the entered value. This is the same as using the Enter key on the keyboard. Note that this is not the same as Apply. It only accepts the entered value and sets the field into a non-edit mode. Selecting Cancel to exit the page would revert the change back to the original value.
To accept the value you can press OK or simply change focus to another setting. You do not have to use this button. - C: This button is optional. The C button cancels the change that has been made in the field and returns the value to the last selected/entered value. If the last value was previously entered with the A button (or Enter), then the C button will return to that entry. Note that this is not the same as Cancel for the entire window.
The Cancel button will remove all changes made to this window and revert to the last Saved/Applied settings.
To revert a value to the previous setting, you can just simply change it to its previous setting, press the Cancel button at the bottom or press the C button.
- A: This button is optional. The A button accepts the entered value. This is the same as using the Enter key on the keyboard. Note that this is not the same as Apply. It only accepts the entered value and sets the field into a non-edit mode. Selecting Cancel to exit the page would revert the change back to the original value.
- Minimize/Maximize/Close: The three buttons in the upper right corner of the window (
 ) from left to right are for the following actions:
- Minimize: When this button is pressed, the window will minimize to a small amount of the title bar and these control buttons.
When a Sierra Chart window is minimized it will not be shown in the task bar, as it is still managed by the main Sierra Chart window. Therefore, this minimized window will be present on the system desktop. It can be moved and placed anywhere on the desktop that is most convenient.

The minimized window will always be associated with the Sierra Chart window which opened it, therefore when that window is minimized and then restored, the New Sierra Chart window will also be restored to its open state. - Maximize: When this button is pressed, the window will maximize to cover the entire screen.
- Close: When this button is pressed, the window will be closed and any modifications which had not been previously saved by selecting Apply All will revert to their previous setting.
- Minimize: When this button is pressed, the window will minimize to a small amount of the title bar and these control buttons.
Selection Specific Options (Working with Sierra Chart Windows)
Pages (Working with Sierra Chart Windows >> Selection Specific Options)
Each window could have multiple pages that it can display. Each page is listed at the top of the window within square brackets []. In the image above the pages available are: [General] and [Chart Values]. Left clicking on the page name will change to that particular page.
The active page is marked with an asterisk (*) to the left of the page name. For the image above, the active page is [*General].
Item List (Working with Sierra Chart Windows >> Selection Specific Options)
An Item List (also known as a drop-down list) allows you to bring up a list of pre-defined items that you can then make a selection from. To use one of these item lists, follow these instructions:
- Left-Click on the specific line in the window for which you want to make the change. This will highlight the line.

- Left-Click on the item to be changed. It is necessary to click on the actual item to be changed on the right, not the name of the item (which is on the left side). It is possible that there is nothing displayed for this item, still click in the same area where the item would be displayed on the right to bring up the list. This opens the list menu.

- Left-Click on the displayed item or on the arrow on the right. This will open the list of items that are available for selection.

- Move the pointer up or down to select a specific item. Once on the item, either left-click or release the left-click button, depending on how the selection above was made. This will select the specific item and close the list.

- Select the A button to the right of the selection or use the Enter key on the keyboard. Either of these will accept the selected entry and close the item list. If the wrong item is selected, then pressing the C button will cancel the last selection and change to the last selected entry.
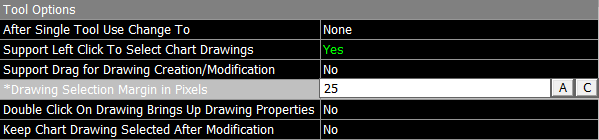
Value Field (Working with Sierra Chart Windows >> Selection Specific Options)
A Value Field allows you to enter a value or text. To enter or change a Value Field, follow these instructions:
- Left-Click on the specific line in the window for which you want to make the change. This will highlight the line.
- Left-Click on the item to be changed. It is necessary to click on the actual item to be changed on the right, not the name of the item (which is on the left side). This will allow the field to be edited.
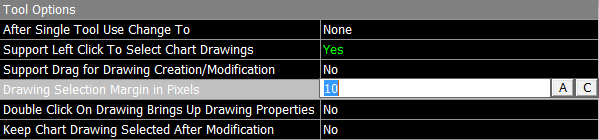
- By default, the existing value will be highlighted allowing entry of the new value without having to swipe or delete any pre-existing information. Enter the new value as needed.
- Select the A button to the right of the selection or use the Enter key on the keyboard. Either of these will accept the selected entry and close the Value Field. If an incorrect entry is made, then pressing the C button will cancel the entry and change to the last entered value.
Toggle Field (Working with Sierra Chart Windows >> Selection Specific Options)
A Toggle Field switches between two different states, typically Yes and No. Clicking on the the current value will switch to the other value.
To change the value in a Toggle Field follow these instructions:
- Left-Click on the specific line in the window for which you want to make the change. This will highlight the line:

- Left-Click on the item to be changed. It is necessary to click on the actual item to be changed on the right, not the name of the item (which is on the left side). This will change the status of the item to its other value.

Button (Working with Sierra Chart Windows >> Selection Specific Options)
Selecting a Button will bring up a new window or perform an action such as Loading or Saving a selection. To use a Button follow these instructions:
- Left-Click on the specific line in the window for which you will be selecting the button. This will highlight the line.

- Left-Click on the button (The button is within square brackets []). It is necessary to click on the button itself which is on the right, not the name of the button, or the reference to the button (which is on the left side).
Selecting the button will perform the action defined by the button. In this example, a new Data/Trade Service Configuration has been created and selecting the Save button will save this configuration.In the example above, selecting the Save button removed the asterisk (*) that was next to DTS Config, since that change has now been saved.
Changing User Interface Behavior
Use the following options to change the user interface behavior of the Settings Windows to meet your required expectations and comfort.
The following settings are in Global Settings >> General Settings >> Settings Windows.
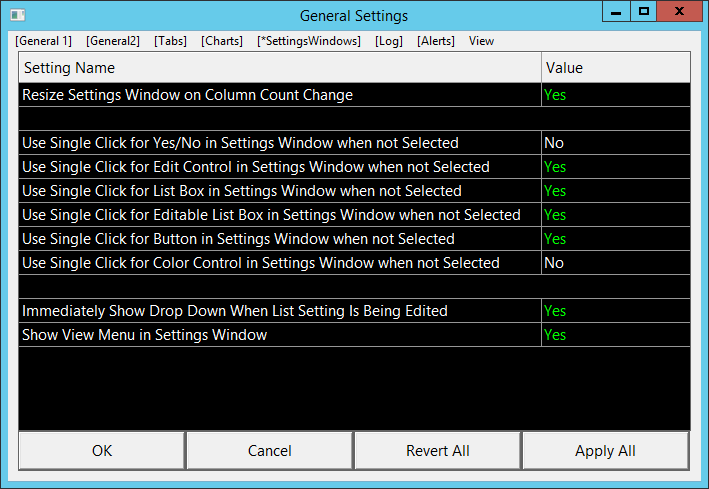
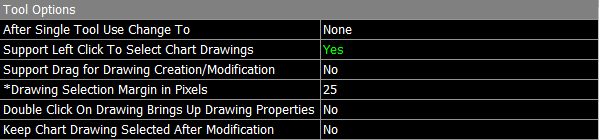
- Resize Settings Window on Column Count Change: When this option is set to Yes, and there is a change to the number of columns on a Settings Window it will automatically resize appropriately. Either larger or smaller.
- Use Single Click for Yes/No in Settings Window when not Selected: When this option is set to Yes, then when selecting the Yes/No area of a non-highlighted setting (any setting other than the currently active one), the setting will change the Yes/No value (Yes will become No and No will become Yes). Otherwise, selecting the Yes/No area of a non-highlighted setting will not change the value.
- Use Single Click for Edit Control in Settings Window when not Selected: When this option is set to Yes, then when selecting the Value Field area of a non-highlighted setting (any setting other than the currently active one), the value field will be selected to allow immediate editing. Otherwise, selecting the Value Field area of a non-highlighted setting will not select the Value Field.
- Use Single Click for List Box in Settings Window when not Selected: When this option is set to Yes, then when selecting the List Box area of a non-highlighted setting (any setting other than the currently active one), the list box will area will be selected. Otherwise, selecting the List Box area of a non-highlighted setting will not select the list box.
- Use Single Click for Button in Settings Window when not Selected: When this option is set to Yes, then when selecting the Button area of a non-highlighted setting (any setting other than the currently active one), the button will be activated. Otherwise, selecting the button of a non-highlighted setting will not activate the button.
- Use Single Click for Color Control in Settings Window when not Selected: When this option is set to Yes, then when selecting the Color Control area of a non-highlighted setting (any setting other than the currently active one), the control will be activated. Otherwise, selecting the color control of a non-highlighted setting will not activate the color control.
- Immediately Show Drop Down When List Setting Is Being Edited: When this option is set to Yes, and a settings row contains a drop-down list box, when the editing begins for that row, the drop-down list will be automatically opened.
- Show View Menu in Settings Window: When this option is set to Yes, then the View menu will be displayed on the Settings windows. Otherwise, the View menu will not be displayed.
Keyboard Shortcuts
The following Keyboard Shortcuts are supported in Settings Windows:
- Control-Enter or Control-Space: Starts editing of a setting or changes state for a Yes/No setting.
- Enter: Finishes editing of a setting and accepts value. If a setting is not being edited, then all changes will be applied and the Settings Window will be closed.
- Escape: Cancels editing and reverts setting. If a setting is not being edited, then the Settings window is closed without saving any changes.
- Tab: Selects the next setting in the list.
- Control-Up Arrow: Selects the previous setting in the list.
- Control-Down Arrow: Selects the next setting in the list.
- Navigating Among Tabs: To navigate among the different tabs of the Settings Window through the menu items at the top, press the Alt key on your keyboard. You will notice that all of the menu items at the top will have one of the letters underlined. Type this letter on your keyboard to switch to the corresponding tab for that menu item.
Scroll Wheel support:
The Mouse Scroll Wheel will scroll the list up or down.
When Global Settings >> General Settings >> Settings Windows >> Use Mouse Scroll Wheel to Select Settings in Settings Window is enabled, then the mouse scroll wheel will iterate through the settings and select a setting.
Searching for Specific Settings
With most of the Settings Windows, it is supported to search for specific settings.
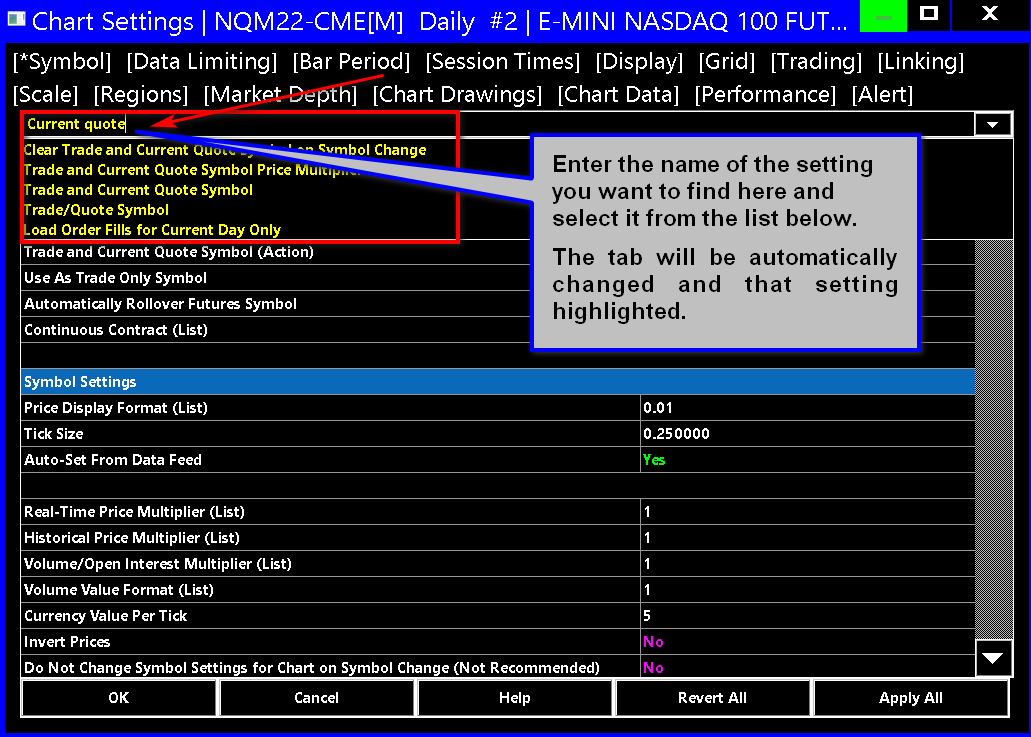
Instructions:
- If the Settings Window has a View menu, make sure that View >> Show Search Box has a checkmark/enabled.
- In the edit box at the top of the Settings Window which supports search, that says "Enter Search Text", type in the text you want to search for.
- Settings which match this text, will be listed in the list below.
- Select the setting that you want from that list.
- The Settings Tab will be changed to the corresponding tab containing that setting. And that setting will be highlighted.
- To control the search behavior select Global Settings >> General Settings >> Settings Windows.
Go to the Select String Matching Method in Search setting. There are two choices:- Extract String Matching: With this matching method there must be exact matches but partial words can be used. Both the search string and existing strings in the Settings Windows are tokenized. There is a comparison, of the individual substring words. So it can display 'Master Mode' as result for 'Mas Mod' and 'Allow Zero Values' for 'Zero Allow'.
- Approximate String Matching: Example: 'alw zr vl' will show 'Allow Zero Values', 'Mstr md' will show 'Master Mode'. These would not be displayed for exact string matching.
New Chart Settings Window
Newer versions of Sierra Chart have a new implementation of the Chart Settings window. This Chart Settings window is based upon the new Settings Windows gradually being implemented within Sierra Chart.
The information in this section is also generally applicable to all of the new Settings Windows within Sierra Chart, in addition to Chart Settings, and the new interfaces for setting the Properties of Chart Drawings and the Configuration of Chart Drawing Tools.
Refer to the Settings Windows video.
The old Chart Settings window and Microsoft Dialogs are fully unacceptable and based upon Microsoft Windows Dialog functionality. It is very difficult working with these types of dialogs when it comes to implementation and programming, and organizing settings within them. They are inherently impossible to adapt to other languages and they malfunction when your computer resources are low due to a faulty design with in Windows, and they are very windows operating system resource inefficient. The font size and face of these old dialogs (referring to the old Chart Settings window) cannot be changed or changed easily. You can only globally try to resize objects on your operating system to get them bigger but then you affect everything. And you only have so much degree of control over that. The colors also cannot be changed or changed easily. Any attempt to change them, if possible, results in changing the settings throughout the entire operating system and you will end up with an appearance that still is not acceptable and have various side effects. These old dialogs also flicker and have performance issues. They are absolutely terrible.
The old Chart Settings window will never be added back. This is something that Sierra Chart engineering would never consider at all. We understand when there is a significant change and users have become accustomed to a particular prior design and implementation, that they learn to "like" the old design and implementation. However, this old dialog design is terrible/unacceptable for numerous reasons which we have explained above. It is important to break free from these wicked and evil and hugely substandard and inefficient and poor quality Microsoft dialog windows, and be supportive of Sierra Chart, with the new enhanced functionality. We do not need to hear complaints! As we have said on the Support Board, we are not going to be influenced by complaints related to wanting the old dialog back. That will not happen. What we will do, is a gradual improvement of the new functionality which we have done since the initial release.
And we are certain, that if Sierra Chart has had these new Settings Windows, for years, and then we went and replaced them with these Microsoft dialog windows, that we would then get complaints of wanting the old interface back. Once again it is a matter of what you have become accustomed to.
The implementation of these new Chart Settings windows, has much less operating system reliance as compared to these old dialogs and can be ported to other operating systems. This is critical to allow Sierra Chart to be ported to another operating system.
The new Chart Settings window and all of the new Settings Windows do at this time support Keyboard Shortcuts to navigate among settings or change a setting to/from Yes/No.
The new Chart Settings window has the following features and functionality.
The user interface behavior of the new Settings Windows that this Chart Settings window is based upon can be changed. Refer to Changing User Interface Behavior. This is an incredible feature to allow you to fine tune the behavior.
The new Chart Settings window is very well organized with all of its settings where related settings are grouped together under each tab, and labeled appropriately. There are many more tabs with descriptive names.
Over time, the organization of the different settings in the Chart Settings window will be improved upon. We will add new tabs and additional subcategories as necessary. This is a gradual process based upon the usage of the window and feedback received. It has already been substantially improved over what has been released previously. For example, there is a new Trading tab where all trading related settings are on a single tab and grouped appropriately.
The Colors and Font size and appearance are fully customizable! This is a major feature to be able to customize, the font and colors of a settings interface. Previously with the old dialogs, the operating system gave you very very limited control of this and any changes would affect the entire system. This is a massive improvement to be able to control the fonts and colors of the settings windows, and even including the font within controls like edit controls and drop down lists. For more information, refer to Colors and Font Settings. You could never do this before with the old dialogs. And when controls like edit controls or drop-down lists are directly on a window you have no control over their size or font size. It was an absolutely terrible issue, with Sierra Chart, these dialog windows and controls directly on windows like the Trade Activity Log. We are working to solve this and give you full control. You do not have this degree of control in other programs. Sierra Chart is at the top of the world and industry, with the degree of flexibility that it gives you with things like this. And there is a lot more work to do and a lot planned. We are not finished yet.
These windows are fully resizable including the width of the settings columns. The size and position of the Chart Settings window is remembered for each chart that it belongs to. The resizing functionality is absolutely essential based upon monitor resolution. It has been an ongoing issue where some old dialog windows appear too small or are too large and not fully visible. These problems no longer exists with these new Settings Windows. This is a massive improvement!
In the case of Drawing Tool Configuration windows, the size and position of each window for each drawing type, is globally saved. So you can resize and position it as you want and it will be restored the same way next time it is opened.
In the case of Chart Drawing Properties windows, the size and position of each window for each drawing type, is saved with each individual chart. So you can resize and position it as you want, for each drawing type, and it will be restored the same way next time it is opened, for each individual chart. For different drawing types, you can also open a separate Chart Drawing Properties window at the same time.
Each chart has its own Chart Settings window which is modeless, meaning that you can interact with the chart at the same time that the Chart Settings window is open. So you can make changes, and then go right back to the chart, and still keep the Chart Settings window open. Multiple Chart Settings windows can be open at the same time.
These windows are extremely fast, flicker free, and use next to no Windows resources unlike the heavy resource utilization of these unstable Microsoft dialog windows which the previous Chart Settings window used.
The previously selected tab is restored when opening the Chart Settings window.
The ability to search for settings by typing the name of the setting.
We also want to point out that the A and C buttons that display to the right when editing a setting in a Settings window are optional. You do not have to press the A button to accept the setting. You only need to press OK or change the focus to a different setting. This is all. In some Settings Windows these buttons do not display.
You are able to right click on a particular settings row, and select one of three Copy commands to copy the Name and/or Value to the system clipboard. There is no settings interface anywhere that offers this functionality. This is a very useful feature to be able to put on the clipboard the particular text of a setting and its value.
All of the above is a massive and extraordinary improvement over what existed previously. We do not think there is any type of software settings type interface, as customizable as what Sierra Chart produced.
*Last modified Monday, 07th July, 2025.