Control Bar
- Customize Control Bars >> Control Bar 1-8
- Copying Control Bars
- Control Bar Buttons Size and Text Size
- Use Same Size for Control Bar Buttons
- Custom Buttons for Intraday Chart Bar Period
- Control Bar Text Drawing Buttons
- Control Bar Chartbook Buttons
- Control Bar Study Collection Buttons and Keyboard Shortcuts
- Control Bar Trade Window Configuration Buttons
- Advanced Custom Study Control Bar Buttons
- Control Bar Button Properties
- Control Bar Colors
- Control Bar Buttons Too Large
- Changing Size of Floating Control Bar Title Bar
- Control Bar Button or Item Not Visible
- Improving Graphics Performance
- Window >> Control Bars >> Control Bar [1-8]
Customize Control Bars >> Control Bar 1-8 (Global Settings)
There are 8 customizable Control Bars configurations available. These 8 Control Bar configurations can be attached to the main Sierra Chart window or to a detached Chart or Spreadsheet window.
The Global Settings >> Customize Control Bars >> Control Bar 1-8 command opens the Control Bar customization window for any of the 8 available Control Bars configurations.
In this window you can Add, Remove, Move Up (move left), and Move Down (move right) buttons on a Control Bar for all of the available menu commands in Sierra Chart.
All of the commands found on the menus are available to be added as Control Bar buttons.
To make one or more the 8 available Control Bars visible, go to either the main Sierra Chart window or to a detached Chart or Spreadsheet window and select Window >> Control Bars >> Control Bar 1-8 and make sure there is a checkmark by the Control Bar you want to be visible.
For complete instructions to make a Control Bar visible, refer to Window >> Control Bars >> Control Bar [1-8] on this page.
Also refer to the Moving and Detaching the Control Bar section.
Copying Control Bars
Follow the instructions below to make one control bar a copy of another control bar.
- Select Global Settings >> Customize Control Bars >> Control Bar 1-8.
- To make this Control Bar the same as another Control Bar, select the other Control Bar number (1-8) through the Same As list on the Customize Control Bar window.
- Press OK.
- Refer to the Window >> Control Bars >> Control Bar [1-8] section for instructions to make the Control Bar visible on the main Sierra Chart window or a detached chart if it is not already.
Control Bar Buttons Size and Text Size
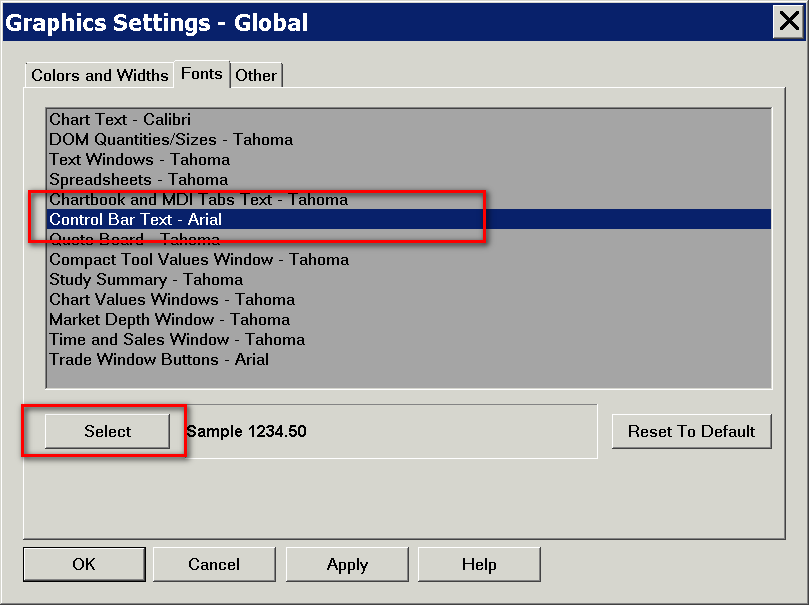
Follow the instructions below to change the size of the text in Control Bar buttons, and additionally the size of the buttons themselves since the button size is controlled based on the text size.
The color of the text of the Control Bar Button is set by the options for Control Bar Enabled Button Text and Control Bar Disabled Button Text in Graphics Settings.
- Select Global Settings >> Graphics Settings.
- Select the Fonts tab.
- Select Control Bar Text in the list.
- Press the Select button.
- Set the Font Size as you require.
- Press OK.
- Press OK.
The size of the text on individual Control Bar Buttons can be independently controlled per button. Follow the below instructions to do this.
- Follow the instructions to change the Properties of the Control bar Button.
- Change the Point Size to a nonzero value. Typically this will be in the range of 8 to 14. Or enter 0 to use the default text size as explained in the instructions above.
- For an example, refer to the image below.

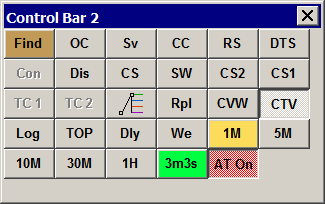
Use Same Size for Control Bar Buttons
Follow the instructions below to set the same size for Control Bar buttons.
- Select Global Settings >> Customize Control Bar >> Control Bar 1-8 .
- Enable the Use Same Size for Control Bar Buttons option.
- Press OK.
- Refer to the image below for an example of how this will appear. This is a floating Control Bar.
Custom Buttons for Intraday Chart Bar Period
There is the capability to customize 20 Control Bar buttons to set a specific bar period for Intraday chart bars. To add and customize these buttons, follow these instructions:
Among all of the 8 Control Bars that can be configured, the Custom Bar Period # buttons are consistent among them and use the same settings. In other words, it is not possible to configure the period settings for a particular button differently among different Control Bars.
- Select Global Settings >> Customize Control Bars >> Control Bar 1-8. You will need to select Control Bar 1 through 8 depending upon which Control Bar you want to customize.
- In the list of Available Control Bar Commands under the Chart Bar Period list, you will find 20 button descriptions starting with the name Custom Bar Period #. These will be at the bottom of the Chart Bar Period list. Add one of these buttons. Any of them will work.
- Select the particular Custom Bar Period # item added to the Selected Control Bar Commands list.
- Press the Set Period... button to configure it to the chart bar period that you want.
- For example, if you want to set a button to a 15 minute bar period, then set Bar Period Type to Days-Mins-Secs and enter 0-15-0 in the Bar Period Value box.
- Press OK. Press OK.
- You will now see the Custom Bar Period buttons added to the Control Bar. Press one of the buttons to change the chart bars of the active chart to the specified period/timeframe per bar.
- If you are using Chart Linking, then other charts which are linked to the active chart will also have their chart bars changed to the very same bar period.

Control Bar Text Drawing Buttons
It is supported to add Control Bar buttons which can be configured to place specific text on the chart when clicking the left Pointer button on the chart. These buttons use the Type Text Drawing Tool.
For complete documentation, refer to Custom Text Drawing Control Bar Buttons on the Chart Drawing Tools page.
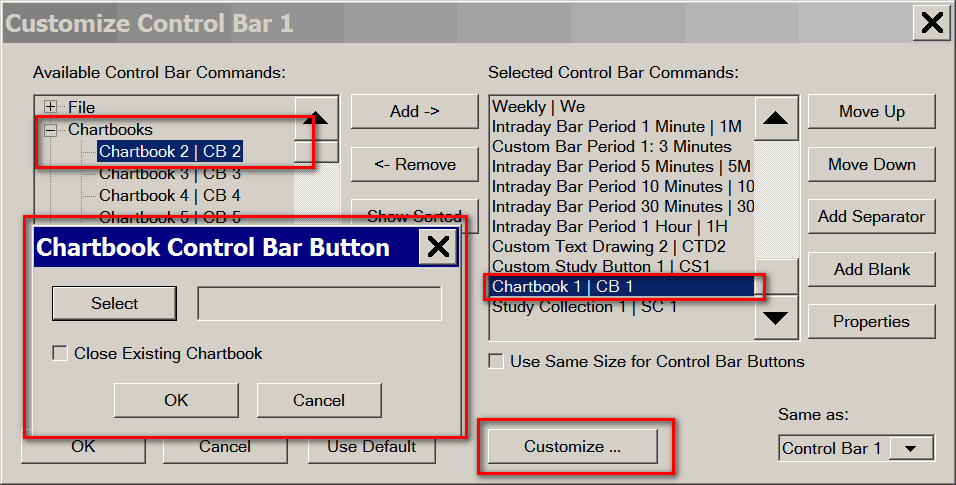
Control Bar Chartbook Buttons
There is the capability to customize 32 Control Bar buttons to open a specific Chartbook with a particular button. Follow through the instructions below to do this.
Keyboard Shortcuts can also be assigned to the configured Control Bar Chartbook buttons. Once a Control Bar button is configured for a particular Chartbook, this button no longer needs to be on the Control Bar to be assigned to a Keyboard Shortcut.
- Select Global Settings >> Customize Control Bars >> Control Bar 1-8. You will need to select Control Bar 1 through 8 depending upon which Control Bar you want to customize.
- In the list of Available Control Bar Commands under the Chartbooks list, you will find 32 buttons starting with the name Chartbook #. Add one of these buttons. Any of them will work.
- Select the particular Chartbook # item added to the Selected Control Bar Commands list.
- Press the Customize... button.
- Select the Chartbook that you want to open for this Control Bar button.
- You can also enable the Close Existing Chartbook option to automatically close the active Chartbook when the Control Bar button is pressed.
- Press OK. Press OK.
- You will now see the Chartbook # (SC #) button added to the Control Bar. Press this button to open the Chartbook if it is not already open.
- Keyboard shortcuts can be set up as well for the Control Bar buttons which have Chartbooks assigned to them. It is first necessary to follow the steps above to configure a Control Bar button for a particular Chartbook before the corresponding keyboard shortcut can be used.
To set up keyboard shortcuts, refer to Customize Keyboard Shortcuts.
Expand the Chartbook Keyboard Shortcuts list for the available commands to set keyboard shortcuts for.
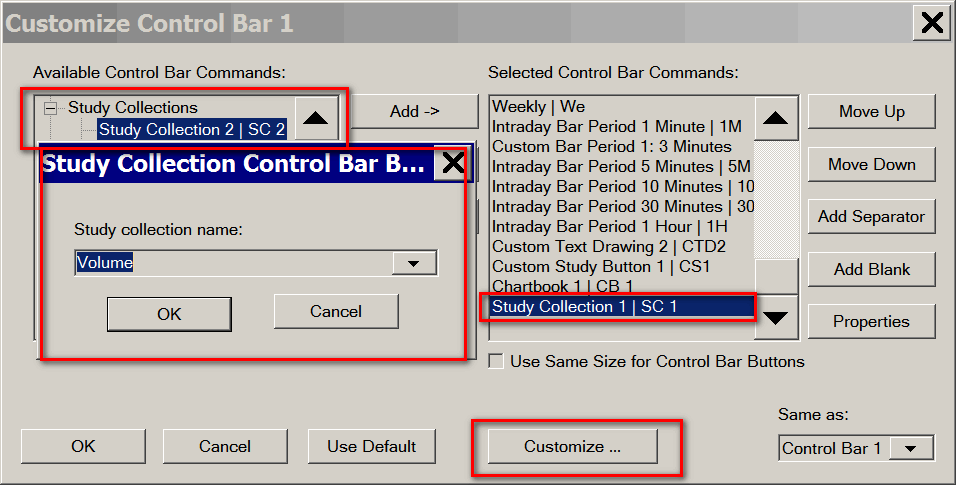
Control Bar Study Collection Buttons and Keyboard Shortcuts
There is the capability to customize 32 Control Bar buttons to apply a specific Study Collection to the active chart with a particular button.
A Study Collection is a saved study or group/collection of studies. These buttons let you change the study/studies on the chart very quickly using any predefined configuration. Follow through the instructions below to do this.
Keyboard Shortcuts can also be assigned to the configured Control Bar Study Collection buttons. Once a Control Bar button is configured for a particular Study Collection, this button no longer needs to be on the Control Bar to be assigned to a Keyboard Shortcut.
- The first step is to save a Study Collection if you have not already. Refer to Create a Study Collection for instructions.
- Select Global Settings >> Customize Control Bars >> Control Bar 1-8. You will need to select Control Bar 1 through 8 depending upon which Control Bar you want to customize.
- In the list of Available Control Bar Commands under the Study Collections list, you will find 32 button descriptions starting with the name Study Collection #. Add one of these buttons. Any of them will work.
- Select the particular Study Collection # item added to the Selected Control Bar Commands list.
- Press the Customize... button.
- Select the Study Collection that you want to set for this Control Bar button.
- Press OK. Press OK.
- You will now see the Study Collection # (SC #) button added to the Control Bar. Press this button to apply the Study Collection to the active chart.
- Keyboard shortcuts can be set up as well for the Control Bar buttons which have Study Collections assigned to them. It is first necessary to follow the steps above to configure a Control Bar button for a particular Study Collection before the corresponding keyboard shortcut can be used. To set up keyboard shortcuts, refer to Customize Keyboard Shortcuts.
Expand the Study Collection Keyboard Shortcuts list for the available commands to set keyboard shortcuts for.
Control Bar Trade Window Configuration Buttons
There is the capability to customize 32 Control Bar buttons to apply a specific saved Trade Window Configuration to the Trade Window of the active chart with a particular button on the Control Bar.
Follow the instructions to do this.
- The first step is to save a Trade Window configuration if you have not already. Refer to Trade Window Configurations.
- Select Global Settings >> Customize Control Bars >> Control Bar 1-8. You will need to select Control Bar 1 through 8 depending upon which Control Bar you want to customize.
- In the list of Available Control Bar Commands under the Trade Window Configurations list, you will find 32 button descriptions starting with the name Trade Window configuration #. Add one of these buttons. Any of them will work.
- Select the particular Trade Window configuration # item added to the Selected Control Bar Commands list.
- Press the Customize... button.
- Select the Trade Window Configuration file from the list that you want to set for this Control Bar button.
- Press OK. Press OK.
- You will now see the Trade Window Configuration # (TWC #) button added to the Control Bar. Press this button to apply the Trade Window Configuration to the active chart Trade Window.
- Keyboard shortcuts can be set up as well for the Control Bar buttons which have a Trade Window Configuration assigned to them. It is first necessary to follow the steps above to configure a Control Bar button for a particular Trade Window configuration before the corresponding keyboard shortcut can be used. To set up keyboard shortcuts, refer to Customize Keyboard Shortcuts.
Advanced Custom Study Control Bar Buttons
Advanced Custom Studies have available to them 150 Control Bar buttons that they can use. Refer to Advanced Custom Study Interaction With Menus, Control Bar Buttons, Pointer Events for complete documentation.
Follow the instructions below to add these Advanced Custom Study Control Bar buttons to the Control Bar.
- Select Global Settings >> Customize Control Bars >> Control Bar 1-8. You will need to select Control Bar 1 through 8 depending upon which Control Bar you want to customize.
- In the list of Available Control Bar Commands under the Advanced Custom Study Buttons list, there are 150 buttons named Custom Study Button #. Add the buttons that you require.
- Press OK.
Control Bar Button Properties
It is supported to set the Caption, Image, Description, Background Color, and Text Font Size for a Control Bar Button. These are known as the Button Properties.
A Control Bar button can display either an image or text. Text delivers higher performance.
Among all of the 8 Control Bars that can be configured, the Button Properties are consistent among them and use the same Properties. In other words, it is not possible to configure the Button Properties for a particular button differently among different Control Bars.
Follow the steps below to do this.
- Select Global Settings >> Customize Control Bars >> Control Bar 1-8.
- In the Selected Control Bar Commands list, select the name of the button that you want to change the button properties for.
- Press the Properties button. Refer to the image below.
- The Control Bar Button Properties window will display.
- Whether an image or caption is shown on the button is controlled by the Caption/Image drop down menu.
- If you want to the button to display text, then enter the text you want to use on the face of the button in the Button Caption text box and set the Caption/Image drop down menu to Use Caption. If you leave Button Caption blank the default text will be displayed for the button..
You will want the buttons to display text, if you are using a high-resolution monitor (4K) and the images are too small. The text size of text buttons, is adjustable globally and per individual button. - Enter the text you want to display when you hover your Pointer over the button in the Button Description text box.
- In the Point Size edit box, enter 0 to use the default Text Size for the Control Bar button text. Or enter the Point Size that you want to use for the text in the Control Bar button. For example, you could specify a value in the range of 8 to 14. Or whatever would be best.
- Press the Color button to change the background color of the button.
- If you want the button to display an image, then set the Caption/Image drop down menu to Use Image.
Press the Set Image button to set an image file to use on the face of the button.
The Open File window will display. It will be showing the files in the \Graphics\Buttons folder in the Sierra Chart installation folder. You can use any of those images or you can add images into that folder through operating system file manager. You can also go to Windows Explorer and view the actual content of those image files. - Using Default Button Image:
Press the Reset button.
If you want the Control Bar button to display the default defined image, if there is one, then set the Caption/Image drop down menu to Use Image.
The button will now use the default image if one is defined for it. - Optionally press the Reset button to use the defaults for the button.
- Press OK to save the changes.
Control Bar Colors
The color of both the background and text of Control Bar buttons, the color of the Control Bar itself, and the colors of other elements of a Control Bar can be customized.
The background color of each Control Bar button is controlled through the Control Bar Button Properties. There are also default colors which are set globally.
To control the global Control Bar colors, select Global Settings >> Graphics Settings - Global. The image below shows the relevant color settings.

Control Bar Buttons Too Large
If the Control Bar buttons are too large or the Status Bar on the Control bar is too large, as shown in the image below, then follow the steps given below.

- Select Global Settings >> Graphics Settings - Global.
- Select the Fonts tab.
- Select Control Bar Text in the list.
- Press the Select button.
- Decrease the Font Size.
- If in the Sample frame there is not sample text displayed, then in the Font list choose a different font name like Arial. This is an important step to follow to resolve the problem. Otherwise, the problem can continue no matter what you set the Size to. So try different fonts until you find one which provides a Sample.
- Press OK.
- Press OK.
Changing Size of Floating Control Bar Title Bar
The size of the title bar of a Control Bar can be changed. Follow the instructions below:
- Go to the Windows Control Panel.
- Go to the Personalization settings.
- Change the size and font of the Palette Titles.
Control Bar Button or Item Not Visible
Follow the instructions below to resolve a problem where a particular button or other item is not visible on the Control Bar.
- Select Global Settings >> Customize Control Bars >> Control Bar #. # is 1 through 8 depending upon which particular Control Bar you want to customize.
- Make sure the particular button or other item is in the list of Selected Control Bar Commands on the right.
- To ensure you can see the particular button or other item, move it up in the list if necessary. To do this, select it in the list and press the Move Up button.
- Press OK.
- Make sure the Control Bar is visible by making sure there is a checkmark by the particular Control Bar number that you have configured in step 1 above. To do this, make sure there is a checkmark by Window >> Control Bars >> Control Bar #. For example, if you configured Control Bar 1, then make sure there is a checkmark by Window >> Control Bars >> Control Bar 1.
Improving Graphics Performance
Each control Bar button that consists of an image rather than a text caption, is a loaded bitmap image in memory. These are Windows GDI objects. When there are a large number of Windows GDI objects, it does slow down the overall graphics performance throughout Sierra Chart. Which means that any time a chart is drawn or anything is drawn on any of the Sierra Chart Windows there is poor performance if there are too many GDI objects.
Therefore, to improve performance, it is not recommended to have too many Control Bar buttons that use images. You should use text as much as possible.
Window >> Control Bars >> Control Bar [1-8]
This section explains how to make Control Bars visible or hidden.
The Window >> Control Bars >> Control Bar [1-8] commands switch the Control Bars at the top (default location) of the Sierra Chart main window, a detached Chart or Spreadsheet window, on and off.
When there is a checkmark by a Window >> Control Bars >> Control Bar [1-8] command, the corresponding Control Bar will be visible.
The Control Bars >> Control Bar [1-8] command on the Window menu of the main Sierra Chart window, controls the visibility of the Control Bar on the main Sierra Chart window.
The Control Bars >> Control Bar [1-8] command on the Window menu of a detached Chart or Spreadsheet window controls the visibility of the Control Bar on that particular detached window.
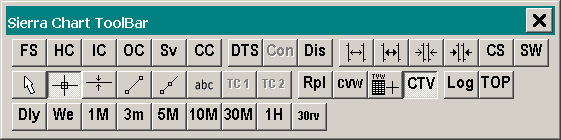
A Control Bar contains buttons for the commands you find on the menus. You can customize the Control Bars. You can also add Control Bar buttons to change to specific time frames per bar in the active chart and perform various other custom functions.
To Add, Remove or reorder buttons on a Control Bar, select Global Settings >> Customize Control Bars >>Control Bar 1-8. Refer to Customize Control Bars for additional information.
Moving and Detaching the Control Bar
By default the Control Bar is docked to the top of the main Sierra Chart window or to a detached Chart or Spreadsheet window.
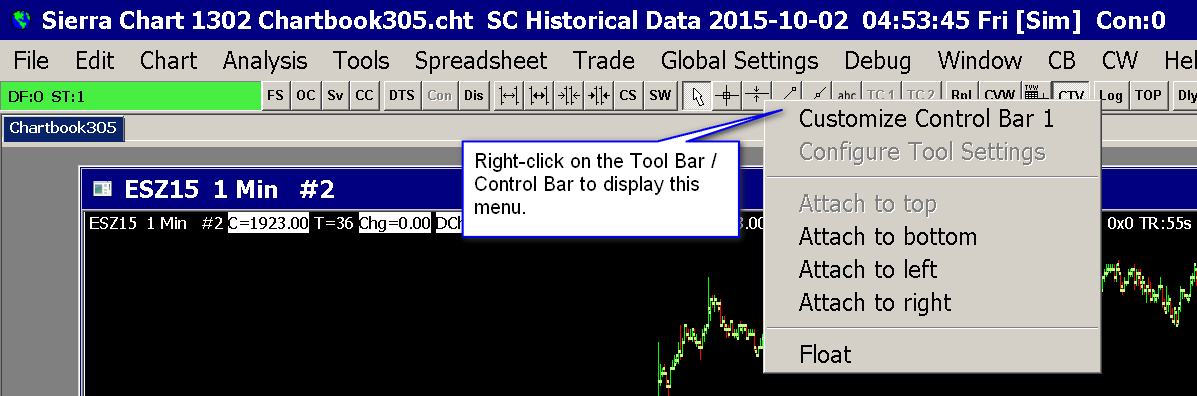
The Control Bar can be attached to any side of the main window or a detached Chart or Spreadsheet window. Right-click with your Pointer on the Control Bar and select one of the Attach* commands to attach it to the Top, Left, Right, or Bottom of the window. Refer to the image below.
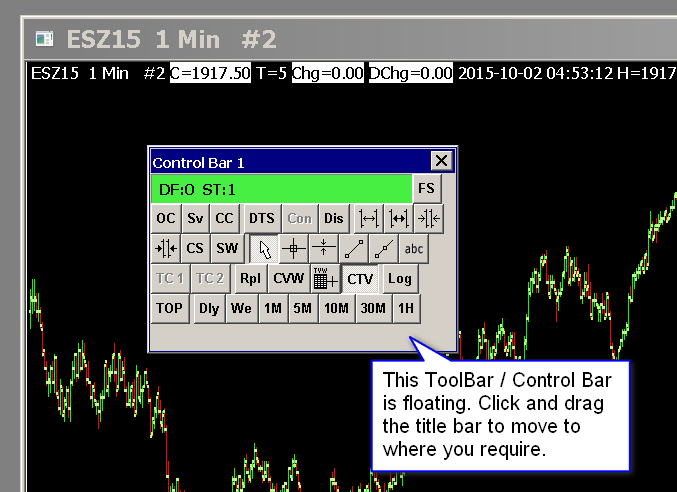
To detach the Control Bar, right-click on the Control Bar and select Float. Once it is detached and floating, you can click on the title bar of the Control Bar and drag it anywhere that you require.
A potential problem is that a floating Control Bar can be partially obscured by the operating system Taskbar. In this particular case it is necessary to move the Taskbar to another location of the screen, then move the Sierra Chart Control Bar out of the way and then restore the location of the operating system Taskbar.
Unable to Make Control Bar Visible
If the Control Bar does not appear when the Window >> Control Bars >> Control Bar 1-8 command is checked for it and if you are using multiple monitors, then make certain you do not see the Control Bar on any other monitor. If you do, then drag it to where you want to use it if it is a floating Control Bar.
The Control Bar can also be attached to any side of the main Sierra Chart window or to a detached Chart or Spreadsheet window. If you still do not see the Control Bar, then select Window >> Reset Windows to reset it to its default state.
After that make sure the corresponding Window >> Control Bars >> Control Bar 1-8 menu command for it is checked.
If the Control Bar was previously floating, was offscreen and then after resetting the windows, it is moved on screen, to then attach it to the main window or to a chart, right click on the title bar of that Control Bar and select one of the Attach commands.
*Last modified Wednesday, 22nd February, 2023.